WordPress automatically creates a new post revision every time you click the Save draft button or the Publish button inside the editor. This is good to prevent you from losing your work due to accidental deletion.
On the other hand, having too many post revisions can make your database get fatter.
To prevent unnecessary bloat on your database, you can limit the number of post revisions on your WordPress website. This post will show you how to do so.
Let’s start by understanding what a post revision is.
Shortcuts ⤵️
An Introduction to Post Revision in WordPress
Post revision is one of the built-in WordPress features. It is a part of the CMS feature of WordPress aimed at document backup.
In WordPress, a new version of post (or page) is created every time you hit the Save draft button or the Publish (the Save button for published posts) button inside the editor. Be it Gutenberg or Classic Editor.
This feature can be a life savior on a certain event. Like when you accidentally deleted a certain part of a blog post. On an event like this, you can use the feature to restore the deleted content by reverting to the previous version of your post.
Or, if you use Gutenberg to design a page, you can also use post revision to switch back to an older version of your design in case the latest one doesn’t look good enough.
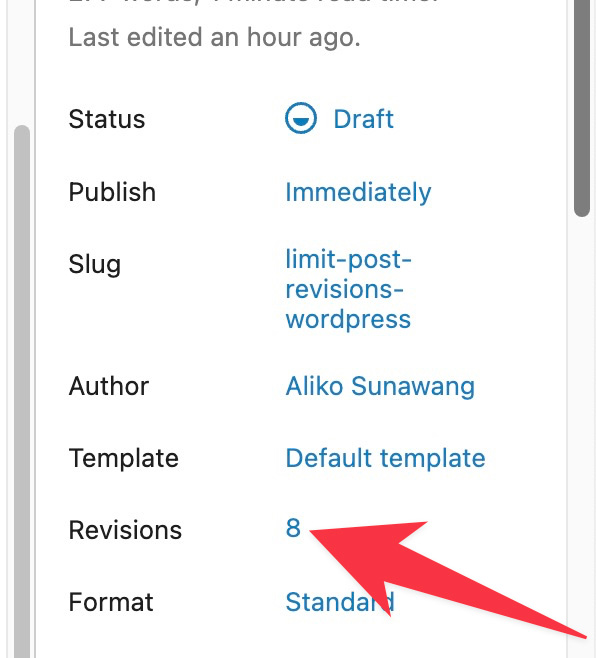
Post revisions are accessible on the settings panel of WordPress editor.
The Problem with Post Revisions
Post revision is a great feature. As stated above, you can use it to restore deleted content or easily switch back to an old version of your design if you need to.
However, it can raise a serious issue if you don’t manage them properly. Especially if you use a hosting service that has limited resources.
WordPress continuously creates a new version of a post/page every time you click the Save draft and Publish/Save button. The more often you edit a post, the more revisions it has as well.
The problem is that every time a post revision is created, a new row is added in the database (the wp_post table).
More rows mean larger database size.
Now, imagine if you have a lot of posts on your website and each post has multiple revisions. How large will your database be?
That’s why limiting the number of revisions is crucial enough. Especially if you have limited storage space on your hosting plan.
Limiting the Number of Post Revisions in WordPress
A little addition. Post revision is different from autosave. Unlike autosave which runs in the background, post revision works only when you click one of the buttons mentioned earlier.
So, when it comes to adding load to the CPU, post revision is less influential.
But still, controlling post revisions is crucial enough to save the resources of your server. Database usage in particular.
Post revision itself is enabled by default in WordPress, but some hosting services may disable it. Here is how to enable post revision, as well as how to limit the number of post revisions.
Before Your Start
Limiting the number of post revisions on a WordPress website requires editing the wp-config.php file.
If you haven’t touched this file before, it’s understandable if you got nervous.
So, before you start, I strongly recommend you to backup your website first. Be it manually or using a plugin.
If you use a managed hosting service like Cloudways, Rapyd Cloud, Rocket.net or Pressable, you can skip this step since these hosting services come with an automatic backup feature. They perform the backup on a daily basis.
If what you do today breaks your website, you can simply restore yesterday’s backup.
Steps to Limit Post Revisions
As mentioned above, you need to edit the wp-config.php file to limit post revisions in WordPress. The easiest way to edit this file is by using the file manager of your hosting service, which usually comes with a text editor feature.
If your hosting doesn’t come with a file manager, you can install and use one of the following file manager plugins:
- WP File Manager
- Advanced File Manager
- Filester
- Bit File Manager
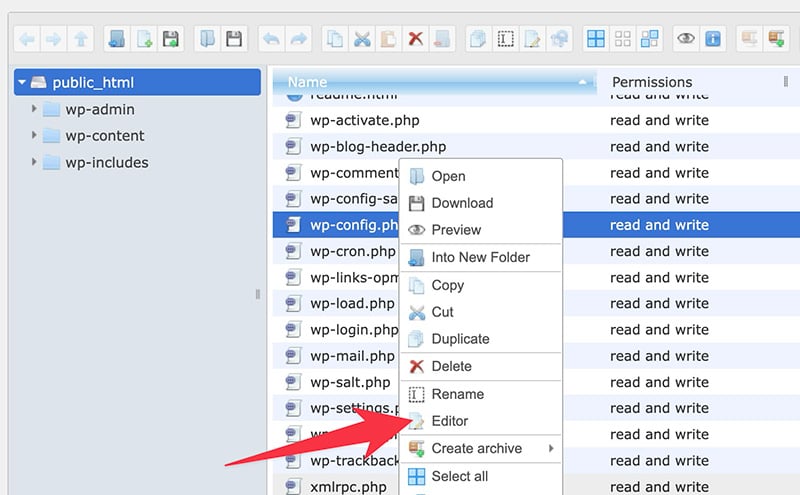
Once you are ready, start by accessing the wp-config.php file which lies under the root directory of your WordPress installation (public_html in most cases). Edit the file using the editor feature of the file manager you use.
If you use WP File Manager, for instance, you can right-click the file and select Editor to edit it.
Add the following line right above the line that says “That’s all, stop editing! Happy blogging/publishing. */“
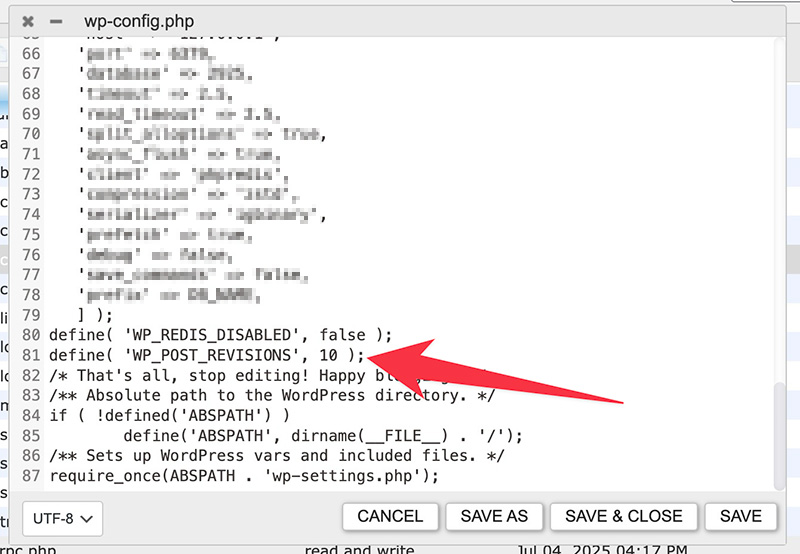
The line to add:
define( 'WP_POST_REVISIONS', 10 );You can replace the number of 10 on the above line according to the number of revisions you want to have on your website. I strongly recommend you to limit the revisions to 5 to 10.
Higher than 10 is not recommended. Remember again, more post revisions mean larger database size.
If you want to disable post revision (I don’t recommend this), you can replace the number of 10 with false.
define( 'WP_POST_REVISIONS', false );Editing the File Via FTP
Using a file manager plugin is the easiest way to edit the wp-config.php file. Unfortunately, some file manager plugins don’t load all files under the root directory.
Another option to edit the file is using FTP.
FTP is a standard feature available on nearly all hosting services. To be able to use FTP, you need to install an FTP client app on your computer.
Some free FTP client apps you can use are:
- FileZilla
- Cyberduck
- Transmit
- WinSCP
Some FTP client apps support integration with the native text editor of your operating system to allow you to edit a text file.
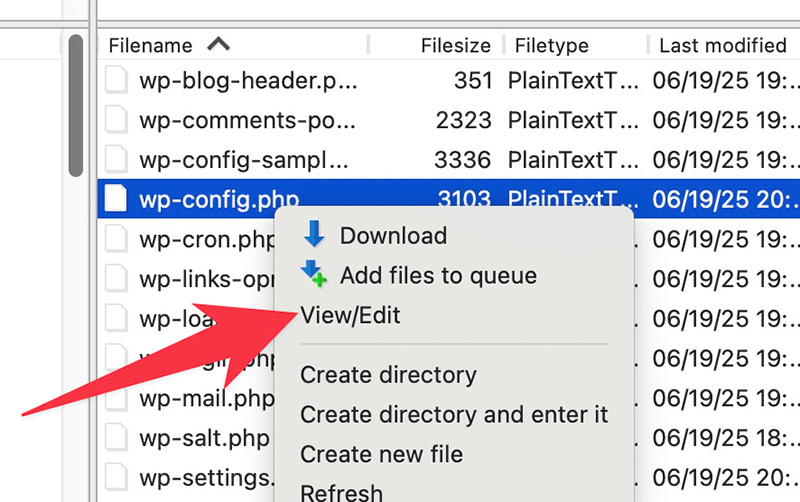
For instance, FileZilla supports integration with macOS’ TextEdit to allow you to edit a remote file without needing to download it first. You can simply right-click the remote file you want to edit and select View/Edit.
You can jump to this section to learn more about how to access and edit remote files using FTP.
Summary
Post revision is a useful feature in WordPress. It allows you to switch between versions of a document. With the feature, you can restore accidentally deleted content, switch back to the previous version of your design, etc.
While post revision is completely useful, it can cause a serious problem on your server. Especially if you are on a hosting plan with limited storage.
To avoid running out of storage space, you can limit the number of post revisions per document as I have elaborated above. Simply edit the wp-config.php file and add the line I provided above and replace the number according to your preference.


