Documenting your journey online while making money. Isn’t it fun? That’s what I have been doing with this blog since 2019.
I blog about WordPress but I am not a developer. Instead, I am just a regular WordPress user with a good level of curiosity. I love to find out how to get things work in WordPress and how to achieve things and then document the processes in blog posts.
Sometimes, I also share my findings in the forms of reviews or listicles.
How do I make money?
There are several ways I make money from this blog. Sometimes, I get paid by just mentioning a certain product on my blog post. Like this one.
But mostly I make money by recommending someone else’s products, in which the practice is called affiliate marketing.
I also earn money when someone on the internet reads my content, regardless of whether they take an action or not.
If you are interested in making money the same way, then read on. I will share everything with you in this post. For free!

🎁 If you want to start a blog on a non-WordPress niche, I have published a comprehensive guide on how to pick a niche for your blog.
READ THE GUIDE
Before You Start
As I said above, I make money from my blog by documenting my journey with WordPress. So, if you want to do the same thing, you need to be familiar with WordPress.
“But Aliko, I have zero knowledge on WordPress”.
If you are already familiar with WordPress, you can skip to this section. If you haven’t known about WordPress yet, then continue with the section below.
It’s About Documenting Your Journey
So, here’s the thing.
Let’s say you haven’t known about WordPress at all and you want to create a new blog or any other type of website with it.
When you are creating a new blog with WordPress, you will naturally learn how to customize your header. You will learn how to customize your footer.
Or even the very basic one. You will learn how to install a plugin.
You will learn everything related to WordPress.
This is the phase that every new WordPress user gets through. Including me when I first created my first ever WordPress blog.
During this phase, you can document your learning process in the form of blog posts.
Next time, when you want to solve a certain issue and it can only be done using a plugin, you can gather the similar plugins and write a listicle.
That’s how you can make money by documenting your journey with WordPress.
You Don’t Need to Be Super Knowledgeable
If you already have knowledge on WordPress, that’s great. But if you haven’t had one, don’t be discouraged about it.
Did you know, when I started my journey with this blog in 2019, I only knew little things about WordPress.
Then, I motivated myself with the following magic words from Russel Brunson.
“You don’t have to be the most knowledgeable person in the world on your topic, you just have to be one chapter ahead of the people you’re helping. There will always be people in the world who are more advanced than you are. That’s fine. You can learn from them, but don’t let it stop you from helping the ones who are a chapter or two behind you.”
There are millions of people on the internet who don’t know about WordPress yet. If you start learning WordPress today, you will be one chapter ahead of them.
You can share your knowledge with those who don’t know about WordPress yet.
Even if someone is already familiar with WordPress, there are many things that they haven’t known about. And you can write the tutorials for them. There are many areas in WordPress you can cover.
Keep this in mind. The longer you use WordPress (and the more you learn about it), the better you will be at it.
What is WordPress?
If you are completely new to the blogging world, then the very first thing you need to know about is WordPress.
WordPress is the software you need to create a blog. It is the most popular blogging platform used by over 43% of the websites on the internet.
Being an open source software, WordPress is super flexible. Not only can you use it to create a blog, but you can also use WordPress to create a membership website, an online store, a marketplace to a learning management system (LMS).
You can extend the functionality of WordPress using plugins. The best part, it takes no coding skills to create a website with WordPress.
WordPress is the best no-code site building tool.
Two Versions of WordPress
WordPress is available in two versions: WordPress.com and WordPress.org. Both WordPres.com and WordPress.org are the same software — WordPress.
What sets them apart is that WordPress.com is WordPress bundled with a hosting service. While WordPress.org is a pure WordPress without a hosting service.
Since WordPress.org doesn’t include a hosting service (because it only provides the WordPress software), you need a hosting service to run WordPress on.
FYI. The vast majority of WordPress-based websites on the internet run on a third-party hosting service. Including this blog.
Most WordPress users prefer using a third-party hosting service because a third-party hosting service commonly offers more freedom. Also, some third-party hosting services offer more features than WordPress.com.
So, Should You Use WordPress.com or WordPress.org?
As a user, you have total freedom over the WordPress version you want to use to run your blog.
WordPress.com is a better suited option if you prefer a simpler solution since it is bundled with a hosting service. But keep in mind that there are some limitations you have to deal with. For instance, you can’t install a plugin unless you subscribe to the Business plan ($40/month).
WordPress.org, wherever you host it, offers total freedom. You can install any plugin. You can install any theme. And most importantly, you can easily switch to another hosting service whenever you want.
WordPress.org allows you to have full control over your blog, your business asset. And for this particular reason, I strongly recommend you use WordPress.org.
What Do You Need to Start a WordPress Blog?
You already know what WordPress is and which version you should use.
The next question is, what do you need to start a blog with WordPress?
To start a new blog with WordPress, you only need two main components:
- A domain name
- A web hosting
Domain name is the web address where your visitors can access your blog on their web browser. An example of a domain name is utilizewp.com.
Web hosting, meanwhile, is the location (server) where your blog is installed.
How to Register a Domain
There are plenty of domain registration services available on the internet. My recommendation is Hover. I recommend Hover for one main reason: it has a super clean control panel. Setting up your domain is super easy in Hover.
You can get a .com domain in Hover for $18.99 per year.
Hover supports several domain extensions, other than .com. But I strongly recommend you use a .com domain as it is the best domain extension for SEO.
A little tip when picking a domain. Pick a domain name that is related to the topic of the blog you want to create.
If you truly want to create a blog that covers WordPress, consider picking a domain that contains the words like “wp” or “web”.
Or you can simply use your name. Something like yournickname+wp can be a great idea.
Keep in mind. Your domain name is your brand. So, pick it carefully.
🚨 Never include the word “wordpress” on your domain name because it is a trademark violation. WordPress is a registered trademark belonging to the WordPress Foundation.
The inclusion of “wp” and “press” on your domain name or brand is legal and doesn’t violate WordPress Foundation’s trademark.
Registering a Domain in Hover
Once you have a domain name idea on your mind, visit the Hover website and type the domain idea on the search box and hit enter.

Pick a domain extension you want to use and click the ADD TO CART button. If the .com extension is not available, consider using a similar name. Try your best to get a .com domain.

Next, click the cart icon on the header to proceed with the payment.

You will be directed to the cart page after clicking the above icon. Click the SECURE CHECKOUT button to continue to the next step.

Continue the registration process by completing the required forms. In this last step, you will be asked to enter your name, username, password, credit card, and so on.
Just like the checkout process on any online platform.

Once your domain is successfully registered, you can login to the Hover control panel. Click the Domains menu and you should see your domain on the list.

Your domain is now ready to use.
How to Pick the Right Hosting Service for Blogging
Choosing a hosting service is the hardest part of starting a new blog. Especially if you are new to WordPress.
There are tens of hosting services available on the market. One of the hosting services I recommend the most is Cloudways.
I recommend Cloudways for two main reasons. First, it offers isolated resources. Meaning that your hosting resources are not shared with other users like on cPanel-based shared hosting services.
A hosting with isolated resources like Cloudways is capable of handling traffic spikes when you run a certain campaign to boost traffic.
Second, Cloudways is relatively more affordable. You only need to pay from $11 per month to host unlimited WordPress blogs (or other site types).
Unlike, for instance, SiteGround, Cloudways doesn’t have inode limits. You can always add a new site as long as your storage is still sufficiently available.
Furthermore, Cloudways offers Vertical Scaling feature to make it easy for you to increase your hosting specs as your blog grows.
Here are key features of Cloudways:
- Unlimited sites
- Multi-layer security (firewall, vulnerability scanner, SSL)
- Automatic and manual backup
- Multiple caching mechanisms on application and server
- Clean, easy-to-use control panel
- Robust staging environment
- CDN (requires an add-on)
Subscribing to a Hosting Plan on Cloudways
Cloudways offers two hosting types: Flexible and Autonomous. The Autonomous hosting type is designed for e-commerce and LMS sites and it is more expensive.
For a blog, you can use the Flexible hosting type which is more affordable. You can start from the lowest and use its Vertical Scaling feature to increase your hosting specs as your blog grows bigger (has high traffic).
The lowest plan offered by Cloudways, the Micro plan, costs only $11/month. But for a production site, I strongly recommend you to subscribe to the Small plan in which the cost is $24/month. You can use the following button to get a 30% discount for 3 months.
CLAIM THE DISCOUNT
To start subscribing to a hosting plan on Cloudways, visit its website and click the Pricing menu. Select a hosting plan you want to subscribe to and click the Start Free button.

Provide your information on the available fields. To use the coupon code above, you can click the I have a promo code link. Tick the EULA and click the Sign up button.

You will be asked to provide some additional information to verify your account. Simply add your information. On the Website URL field, you can type the domain you have just registered above.
Click the Submit details to verify your account.

The Cloudways team will verify your registration. You will get an email notification once your registration is approved.
Cloudways Alternatives
If you are not interested in using Cloudways to power your blog, then you can use one of the following alternatives.
Before you subscribe, make sure to learn the detailed specs. Be careful with the word “unlimited sites”. Especially on a shared hosting service because a shared hosting usually has inodes limit.
Also notice the initial price and the renewal price closely. Most hosting services offer a discounted price during registration but charge the full price on renewals.
Here is the list of Cloudways alternatives I recommend:
Hosting | Key highlights | Price | |
---|---|---|---|
Kinsta | Built with performance in mind. Fully managed hosting for WordPress | From $35/mo | Learn more ↗️ |
Pressable | More affordable, excellent performance. | From $25/mo | Learn more ↗️ |
Bluehost | Has a domain registration, more affordable. | From $11.99/mo | Learn more ↗️ |
Rapyd Cloud | An ideal option if you want to focus on growing a single blog. | From $35/mo | Learn more ↗️ |
ChemiCloud | More affordable. Free domain for a year. | From $13.95/mo | Learn more ↗️ |
GreenGeeks | More affordable solution for multiple blogs/websites. | From $12.95/mo | Learn more ↗️ |
Getting Your Blog Online in 10 Minutes
Once your Cloudways account is ready, you can start to add your blog.
For your information, Cloudways is technically a VPS. Thus, you need to add a server first before you can add a new application/website.
And before you can add a server, you need to create a new project.
Adding a New WordPress Site in Cloudways
To get started, login to Cloudways with your account. Once logged in, go to the left panel and hover your cursor over the cabinet icon and select My Projects. Simply click the Add Project button to add a new project.

Give your project a name and click the Create Project button at the bottom.

Once your project is ready, you can start to add a server. To do so, hover your cursor over the cabinet icon on the left panel and select My Servers. Click the Add Server button to add a new server.

Select an application you want to add to your server from the dropdown menu and then give your application (your WordPress blog) and the server a name and select the project you have just created above.

Pick a cloud platform to power your server (DigitalOcean, Vultr, Linode, AWS or Google Cloud) and select the server type. Use the slider to set your VPS specs (you can toggle between Premium server and Standard server).
Pick a server location and click the Launch Now button to launch your server and app.

Wait until Cloudways is done setting up your server and application. Once done, you can manage your application by clicking My Applications on the left panel to open the control panel of your WordPress blog.
From the application control panel, you can find the login information which you can use to login to your WordPress dashboard on the Admin Panel section.
Click the link to open the WordPress dashboard and use available username and password to login.

Connecting Your Domain
You have successfully added your WordPress blog on Cloudways, but you can only access it via a temporary domain that Cloudways provides (e.g. https://wordpress-1465724-5627214.cloudwaysapps.com).
To make your blog accessible via the domain you have registered via Hover (or any domain registrar of your choice), you need to connect it with the domain.
To do so, first, login to Cloudways and open the control panel of your WordPress application. Go to the Domain Management menu and click the Add Domain button.

On the appearing popup window, enter your domain and click the Save Changes button.

Once your domain is added, you can make it as the primary domain by clicking the three-dot icon and selecting Make Primary.

Next, you need to add a new A record on your domain registrar (Hover, GoDaddy, Name.com, etc.). You do it by entering the IP address of your server.
To find the IP address of your server, simply hover your cursor over the cabinet icon on the left panel and select My Servers. The IP address lies beneath the server name.

Next, login to your domain registrar and select the domain you want to connect to your application and find the menu to manage the DNS.
If you use Hover, you can find the menu under the EDIT menu.

Click the ADD A RECORD button to add a new record.

On the appearing popup, set the record type to A. Type your domain name to the HOSTNAME field and the IP address of your Cloudways server to the IP ADDRESS field.
End by clicking the ADD RECORD button.

Wait until the DNS is fully propagated. The process can take up to 24 hours so be patient.
Setting Up SSL
SSL (Secure Sockets Layer) is a security feature that forces your blog to be accessed via HTTPS instead of HTTP. Without SSL, web browsers will flag that your blog is not secure.

Cloudways has a built-in SSL feature, but you need to configure it. Here are the steps.
Go to the SSL Certificate menu on the application control panel. Select Let’s Encrypt on the SSL option and type your email address on the Email Address field.
On the Domain Name field, you can type/paste the domain name you have just connected above and click the Install Certificate button.

Accessing Your WordPress Dashboard
Once your WordPress blog is successfully connected with your domain, the next step is to access the WordPress dashboard (the administration area).
To access your WordPress dashboard, type your domain on the browser address bar and add an extra string “wp-admin”.
For instance, if your domain is mywpblog.com, then the full URL you need to type is mywpblog.com/wp-admin. You should see the following login form after hitting the enter key on your keyboard.

Type the username and password which you can find on the application control panel and click the Login In button or simply hit enter key on your keyboard.
If everything is good, you will be directed to your WordPress dashboard.
Here is the main screen of the WordPress dashboard.

For your information, you can hide the elements you don’t want to see on the main screen inside the WordPress dashboard.
To do so, click Screen Options on the upper-right corner and uncheck the elements you want to hide.

Things to do After Your Blog is Online
- Set up site identity
- Set up URL structure
- Set up Gravatar
- Install the necessary plugins
- Connect your blog with GSC
- Add post sitemap to GSC
Your blog is already online. What’s next?
Remember. You want to create a blog to make money. So, everything has to look professional. Also, you need to prepare everything to support your blog business.
Here are some crucial things you need to do after your blog has gone live.
Set Up the Site Identity
You already set the name of your blog on the setup process of your blog, but other settings related to site identity need to be made yourself via the WordPress dashboard.
There are three settings you need to make related to site identity:
- Site name/title
- Tagline
- Favicon

To set your site identity, go to Settings -> General on your WordPress dashboard.

As you can see, the top three setting options allow you to set the site name, tagline, and favicon.

Just make sure to click the Save Changes button at the bottom once you are done making these settings.
A little tip, use a transparent image in a PNG format for the favicon. Also, make sure the image is in square with the minimum dimension of 512 × 512px.
If you don’t have Photoshop to edit the image, you can use free alternatives like Gimp, Photopea, and Pixlr.
Set Up the URL Structure
By default, WordPress has the URL structure of domain/year/month/date/post-name (yourdomain.com/2024/05/13/sample-post/).
This URL structure is not recommended for a blog. Why? Because you are not going to build a news site.
Also, a simpler URL structure is better for SEO.
The recommended URL structure is domain/post-name (yourdomain.com/sample-post/).
To change the default URL structure, go to Settings -> Permalink on your WordPress dashboard. Select the Post name option and click the Save Changes button.

Set Up Gravatar
Gravatar is your visual identity when blogging with WordPress. It is an image that shows up when you comment on someone else’s blog.

Gravatar also shows up on your own blog. In most cases, it shows up on the author profile section beneath the post content or on the post meta. The placement is completely controllable.
In my blog, I display Gravatar beneath the post content, as you can below.

To add Gravatar on your blog, you need to create a Gravatar account. Simply visit the Gravatar website and create your account. Go to the Avatar menu and upload an image you want to use as your Gravatar.
No extra setting is required on your WordPress blog in order to have your Gravatar to show up. You just need to use the same email address for your Gravatar account and the profile account on your blog.
Install the Necessary Plugins
Plugins are what make WordPress so powerful. A plugin is a set of codes written in PHP, JavaScript and CSS designed to add a certain feature or functionality in WordPress.
There are tens of thousands of plugins available on the official WordPress repository or third-party marketplaces like CodeCanyon and TemplateMonster.
Of course, you don’t need to install them all. In fact, installing too many plugins can slow down your WordPress blog.
💡 You can read this post to learn how to install a new plugin in WordPress.
Here are the plugins you need to install on your blog:
- Yoast. The plugin you need to add SEO features. Yoast is the most popular SEO plugin widely used by bloggers, including me. You can use it for free.
- Independent Analytics. The plugin you need to add the analytics feature on your blog. You need it to learn metrics like number of visitors (daily, weekly, monthly, or specific period), number of page views, etc. You can also use Independent Analytics for free. If you prefer to use Google Analytics, then you don’t need to install Independent Analytics.
Plugins You Don’t Need to Install
As your blog is running — and as you have more knowledge on WordPress — you may want to add certain features to your blog.
Before you install a new plugin to add a certain feature, make sure that the feature is not available on Cloudways or Divi.
Remember again. Why spend more money (or wasting your hosting resources) on extra plugins when the features are already available on your hosting service or theme?
You don’t need to install the following plugin types if you use Cloudways as your hosting service and Divi as your theme.
- Form builder plugin. Divi already comes with features to create both a contact form and email opt-in form.
- Backup plugin. Cloudways already comes with an automatic backup and manual backup features. It performs the backup on a daily basis (the backup frequency is controllable via the application control panel)
- Security plugin. Unless you want to add a specific security feature (e.g., login limit attempts), you don’t need to install a security plugin. Cloudways already comes with a firewall (WAF) to protect your blog.
Connect Your Blog with Google Search Console
As a blogger, you will be dealing with Google more often than before. Google is the main organic traffic channel for all bloggers. The process to make your blog posts to show up on the first page of the Google Search results page (SERP) is called SEO (Search Engine Optimization).
Before you step even further with SEO, the very first thing you need to do is to connect your blog with Google Search Console (GSC).
What is Google Search Console?
Google Search Console is a tool from Google that allows you to monitor the performance of your blog posts on Google Search.
On GSC, you can monitor metrics like how many clicks you have earned from Google Search during certain periods, which search queries that drive more traffic, most visited pages, and so on.

How to Connect Your Blog with Google Search Console
To connect your blog with Google Search Console, first, visit the website of Google Search Console and login with your Google account.
Enter the full URL of your blog on the right column (URL prefix). If your blog has “www“, make sure to add it to the URL too. Click the CONTINUE button.

Click the HTML file provided by Google Search Console to download.

Next, you need to upload the HTML file to the root (main) directory of your WordPress installation. Since Cloudways offers no file manager feature, you can upload the file via FTP. For this, you need to install an FTP client on your computer.
Or, you can also upload the file using a file manager plugin.
I have a separate article that you can read to learn how to upload a file to the server and vice versa.
Once the file is uploaded, switch back to the Google Search Console tab and click the VERIFY button.

If everything goes well, you will see the white checklist icon like the one below. You can click the GO TO PROPERTY button to open the Google Search Console dashboard.

To make your blog stay verified, don’t delete the HTML file you have uploaded.
FYI. You can use one Google account to connect multiple blogs/websites on Google Search Console.
If you want to connect more websites, you can click the dropdown menu on the upper-left corner and select Add property.

Add Your Blog Sitemap to Google Search Console
After successfully connecting your blog with Google Search Console, the next step is to add your blog sitemap to it.
What is a sitemap and why do you need to add one?
A sitemap (XML sitemap more precisely) is a file that provides information about the content on your blog/site. The file is aimed at search engines to help them find, crawl and index your blog posts.
To add your blog sitemap to Google Search Console, first, login to your WordPress dashboard and open the Yoast settings screen.

Scroll down to the APIs section and click View the XML sitemap button.

Click the post sitemap (the top sitemap) and copy the slug (the post-sitemap.xml
string).

Next, switch back to the Google Search Console tab on your web browser and click the Sitemaps menu. Enter the slug you have just copied and click the SUBMIT button.

Writing Blog Posts
When you visit the post sitemap above, you don’t see any link yet. That’s because you haven’t posted a single post yet.
In this section, you will learn how to write your first post on your blog.
Introduction to Block Editor
To start writing your first-ever blog post, login to your WordPress dashboard and go to Posts -> Add New Post. This will open up the WordPress content editor.

For your information. The WordPress content editor is called block editor (also known as Gutenberg). The name refers to how the editor itself works.
In Gutenberg, every element is considered a block. When you are adding a paragraph element, you are adding a paragraph block. When you are adding an image, you are adding an image block.
Similarly, when you are adding a button, you are adding a button block. And so on.
To add a new block, you can click the plus icon inside the editor area. Or you can also type the “/” key on your keyboard.
Another way to add a new block is by clicking the plus icon on the icon bar which lies above the content area.

To make your posts be more organized, you can add both category and tag before you publish it.
I have written a more detailed post aimed at helping you use Gutenberg to write your blog posts.
Classic Editor
You can actually use Classic Editor (the WordPress default editor before Gutenberg) to create content on your blog. But I strongly recommend you to stick with Gutenberg as it has better support by the WordPress community.
In case you want to try Classic Editor and you use Divi, you can go to Divi -> Theme Options on your WordPress dashboard.

On the Divi Theme Options screen, go to the Builder -> Advanced tab and switch the Enable Classic Editor option on. Click the Save Changes button.

If Class Editor is enabled, you will see the following editor interface when creating a new post in WordPress.

If you don’t use Divi, you can enable Classic Editor manually. Here is the tutorial to do so.
How to Find Blog Post Ideas
Blogging about WordPress is about documentation. You can document your learning process into blog posts.
A simple instance. If you are completely new to WordPress and have no idea about how to install a plugin yet, you can learn it first and then write a blog post about it.
From the above example, you can use a blog post title like “How to Install a New Plugin in WordPress” or “A Guide to Installing a New WordPress Plugin”.
Another example.
If you still don’t know how to customize your blog header, you can also write a blog post about it after learning how to do it.
If you are new to WordPress, you should be thankful because there are so many blog post ideas you can write.
Using Wordtracker to Get Blog Post Ideas
If you are really clueless about the blog post ideas you want to write, you can use Wordtracker. It is an affordable keyword research tool I personally use. Only $24 per month. Way more affordable than Semrush ($139 per month) and Ahrefs ($129 per month).
With Wordtracker, you will be able to get hundreds of keyword ideas (which you can turn in blog posts) in less than a minute.
All you need to do is to enter the main topic (e.g. WordPress) to the available field and the tool will present to you a list of keywords related to WordPress.
Here are the steps to get keyword ideas with Wordtracker:
- Step 1: Visit the Wordtracker website and go to Features -> KEYWORD TOOL.
- Step 2: Enter the main topic to the available field and click the Search button.
- Step 3: Pick the keywords and store them in a spreadsheet file.
Record Your Blog Post Ideas into a Spreadsheet File
You already have tons of blog post ideas thanks to the help of Wordtracker. Next, you can pick some of them and store them into a spreadsheet file. You can use any spreadsheet software. From Microsoft Excel, Numbers (Mac only) or Google Sheets.
You can pick keywords that have high search volume and low competition level.
I have created the following spreadsheet file on Google Sheets in case you need an example about how to store the keyword ideas.

Designing Your Blog
Your blog is already online. You also already know how to write a blog post in WordPress.
What’s next?
Now, it’s the time to make your blog look more professional by editing its design.
For this part, you need to choose the right theme. The theme you use determines what kind of design you can apply to your blog. Also, it determines which parts on your blog that you can create the custom design of.
Continue to the following section to learn how to choose the right theme for blogging.
How to Choose the Right Theme for Blogging
There are tens of WordPress themes available on the internet. Most of them are free to use, but offer limited features and fewer design options. Most WordPress themes offer a pro version with more advanced features.
If you have enough time, you can try some free themes to find which one is best suited for you. Otherwise, I have crafted a list of the most-used WordPress themes that you can read.
Here are some crucial things to need look for when picking a WordPress theme for a professional blog:
Design Options
One thing you need to know first. There are two WordPress theme types: block theme and classic theme.
By default, WordPress comes with the first theme type — block theme. You can call a theme a block theme if it has a Site Editor feature (also known as Full-Site Editor).
To check if a theme has the Site Editor feature, you can hover your mouse over the Appearance menu. If you see a sub-menu item called Editor, it means that the theme has the feature.

On a block theme, you can design every single part of your blog via Site Editor. From the header, footer, archive pages, and so on. The editing process itself is done using block editor (Gutenberg).
If you find a sub-menu item called Customize instead of Editor when you hover your cursor over the Appearance menu, then you are using a classic theme on your WordPress blog.

Clicking the Customize sub-menu item will take you to the Theme Customizer screen. From here, you can customize the design of header, footer, archive pages, and other parts on your blog.
The setting options available on Theme Customizer varied, depending on the theme you use.
Some WordPress themes, however, offer their own customization feature via a dedicated settings panel or via theme builder.
Some Design Options You Can Consider
In general, a WordPress website (including your blog, of course) consists of the following parts:
- Header
- Footer
- Archive pages (category, tag, author)
- Single post template
- Search results page
- 404 error page
Make sure that the theme you use has the setting options to customize all the above parts. This is crucial because as soon as your blog has high enough traffic, you will optimize certain conversions by placing a button or link here and there.
In a certain case, you may want to create a custom template for the most-visited blog post on your blog to optimize it. In a case like this, consider using a theme that comes with a theme builder feature.
What is a theme builder?
Theme builder refers to a feature that allows you to create custom templates for all the site parts on the list above.
The main perk of using a theme builder to customize your site parts is that you can set the location where a certain template to apply. For instance, you can create a dedicated custom template for the most-visited blog post to push the sales of a certain product.
On the custom template, you can add elements like a floating button, a floating banner, or anything aimed at boosting the conversion.
Divi is an example of themes that comes with a theme builder feature.

Divi offers a built-in page builder feature to make it easier for you to create custom templates.
You can also use the page builder to create the core pages on your blog. Such as homepage, about page and contact page.
Plugin Requirements
As I mentioned above, the vast majority of WordPress themes are released as freemium products. Meaning that there are two versions available: free and pro.
One crucial thing you need to know. Most theme developers also develop plugins. In many cases, you will be asked to install the plugins they develop to add a certain feature or functionality to your site.
A simple instance.
Say you want to create an email opt-in form and want to connect it with a certain email marketing platform.
In most themes, you are required to install an extra plugin. Even worse because you need to spend extra money because integration with email marketing platforms is usually a paid feature.
Email Marketing Integration Support
Email lists are the biggest asset of an online business. Blogging is no exception.
In the context of blogging, you can use your email list as an added bargaining power when sending a partnership proposal to a potential client.
To build an email list, you need an email opt-in form connected to an email marketing platform like MailerLite, Mailchimp to MailPoet.
As I have just mentioned above. In most themes, you are required to install an extra plugin to create an email opt-in form and connect it with an email marketing tool of your choice.
Divi is one of the themes that comes with a built-in email opt-in form builder. It supports integration with 20+ email marketing platforms. Including the popular platforms like Mailchimp, MailerLite, ActiveCampaign to AWeber.
In addition, Divi also comes with a contact form builder which is useful enough to be added to a contact page.
Support
Support is another aspect you need to consider when picking a theme for blogging because no product is perfect.
When you experience a certain issue with your theme and you can’t fix it yourself, you can ask some help from the theme developer.
Most theme developers offer ticket-based support. Meaning that there will be a long enough delay to get your inquiries answered.
Consider picking a theme that offers live-chat based support for a quicker troubleshooting process. Or at least pick a theme that has decent documentation.
Recommended WordPress Themes for Blogging
Divi is the theme I recommend the most to create a professional blog with WordPress. It has all the features I mentioned above. With Divi, you don’t need to install an extra plugin to create forms — be it a contact form or email opt-in form.
Also, Divi comes with a theme builder feature which offers limitless design options. You can customize every single part of your blog with it.
The main reasons I strongly recommend Divi (I also use it on this blog, by the way):
- Cost efficient. You don’t need to spend extra money on a form builder plugin. Divi is also a perfect option if you plan to create multiple blogs as you can install Divi on unlimited blogs with a single subscription account. If you hate a subscription-based payment model, Divi also offers a one-time payment option (although slightly pricier).
- Excellent Support. Divi offers live-chat based support to make sure your inquiries get answered more quickly. But that’s not the best part. Based on my own experience, the Divi support team always provides a real solution to your issues. Even if it involves code addition.
- Extensive plugin compatibility. As your blog grows, you may want to add an extra monetization model (e.g., paid membership). With Divi, you are safe because most WordPress plugins are compatible with it.
If you prefer to start your professional blogging journey with a free theme, the one I can recommend is GeneratePress.
GeneraPress offers plenty of design options on its free version. But again, you need to install plugins to add certain features and functionalities to your blog.
Designing Your WordPress Blog with Divi
I have mentioned that your WordPress blog consists of 6 main parts:
- Header
- Footer
- Archive pages (category, tag, author)
- Single post template
- Search results page
- 404 error page
Divi comes with a theme builder feature to make it easy for you to edit these parts. Plus, you can also use its built-in page builder to create the core pages of your blog.
Since this particular section is too long to write here, I’ve decided to write a separate post that you can read below.
In the post below, you can learn how to design every single part of your blog with Divi. I also included ready-to-use templates for every part.
Monetizing Your Blog
Your main goal of starting a new blog is to make money. This means, you will monetize your blog’s content.
As I mentioned on the opening section, I make money with this blog via the following monetization methods:
- Paid partnership (by mentioning a product)
- Affiliate marketing
- Installing display ads
Apart from the above three methods, I also make money selling paid content. So in total, there are 4 monetization methods I apply on this blog.

One key concept you need to understand as a professional blogger is content marketing.
Content marketing is a marketing strategy where you promote a product via your content. In the context of blogging, you do that by mentioning the product you promote on your blog posts.

During your professional blogging journey, you will be dealing with content marketing a lot.
In general, there are three content types you can write on your blog and you can mention/promote a product in any of these content types.
- Tutorial
The type of content/blog post aimed at helping your readers fix a certain issue with their WordPress website. This type of post is a bit technical and requires screenshots in most cases.
No worries. You don’t need to have a programming background to create tutorial content. In WordPress, nearly all problems can be solved with a plugin.
You know what it means?
Yes, you only need to learn how to use a particular plugin and then document your learning process into a blog post.
You can read some examples of this content type here.
- Listicle
Listicle is the type of content that rounds up some items into a post. The goal of this content type is to help your readers to make a better decision by narrowing down the options.
For instance, when I write a post titled “8 Best WordPress Analytics Plugins”, my goal is to help those who are looking for an analytics plugin for WordPress to pick which plugin they should use.
I help them by putting together the best analytics plugins in my post.
Listicle is a great content type to promote affiliate products.
- Product Review
Product review is also a great content type to promote an affiliate product. This content type has the highest conversion rate because people who are looking for a review of a certain product already know about the product (brand).
They just want to learn the product deeper before making the purchase.
Apart from affiliate marketing, you can also monetize this content type by partnering with the vendors (will be covered shortly below).
4 Ways to Monetize Your Blog
Above, you have just learned three content types that you will write a lot on your blog.
Did you know that you can monetize each content type?
You read it right. You can monetize each content type on your blog if you want it. Be it via partnership or affiliate marketing.
Here is how.
1. Paid Partnership
Paid partnership is the monetization model where you collaborate with a product vendor to produce the content. The product vendors can be a theme developer, plugin developer, hosting provider to a SaaS provider.
In this monetization model, you help a vendor get more exposure for its product by sharing your content — in which you mention the product on — with your audience.
In return, the vendor gives you money so that you can keep your business running — and profitable.
Win-win.
How does this monetization method work?
First, you send a partnership proposal (via email) to a potential client. In your email, you can write the details about the partnership opportunity you want to offer. This includes the fair partnership fee.
But how to send a partnership proposal? Who should you send the proposal to?
I have written a detailed guide on how to send a partnership proposal below. I’ve also included the database of potential clients you can send the proposal to.
A little note. If you have a big, established blog, you don’t need to send partnership proposals. Instead, the vendors will usually come to you.
That’s why the sooner you start your blog, the better because the more content you have, the more visitors you will get as well.
When Can You Start to Send Partnership Proposals?
Be realistic. No one will accept your partnership proposal if your blog has no decent metrics yet. The main metric that has the strongest bargaining power is monthly visitors.
I strongly recommend you to start sending partnership proposals once your blog has at least 10,000 monthly visitors.
How long does it take to get your first 10,000 monthly visitors?
It depends on your strategy. If you are good enough at arranging the strategy, you can get your first 10,000 monthly visitors in less than 6 months.
You can learn how to drive traffic to your blog in this section.
2. Affiliate Marketing
Making money from affiliate marketing is the common practice adopted by most bloggers (and YouTubers). But they mostly do it the wrong way.
How to run affiliate marketing the right way?
One obvious thing. Not all affiliate programs are worth joining. If you truly want to build sustainable revenue (passive income) via affiliate marketing, I strongly recommend you only join affiliate programs that offer recurring commissions.
There are a bunch of vendors in the WordPress scene (and SaaS industry) that offer recurring affiliate commissions.
But it is only one thing. There are many other things you need to consider before you join an affiliate program.
How to Pick the Right Affiliate Programs to Join
I have been running this blog for more than 5 years. During this time span, I have joined countless affiliate programs offered by WordPress developers, hosting providers, and SaaS vendors.
That’s why I am extremely confident to say that not all affiliate programs are worth joining — unless you want to waste your time.
Based on my experience, Elegant Themes is best affiliate program provider for the following reasons:
- Its flagship product, Divi, is one of the most popular paid themes in the WordPress space.
- Unlike most affiliate providers which usually adopt Net 60 payment, Elegant Themes pays you on the first week of the next month if you have reached payment threshold ($200) in the running month.
- It offers lifetime recurring commissions.
- It offers a high commission percentage (50%).
- It has multiple products and services you can promote. Including products from third-party developers on Divi Marketplace.
- You will have a dedicated, supportive affiliate manager.
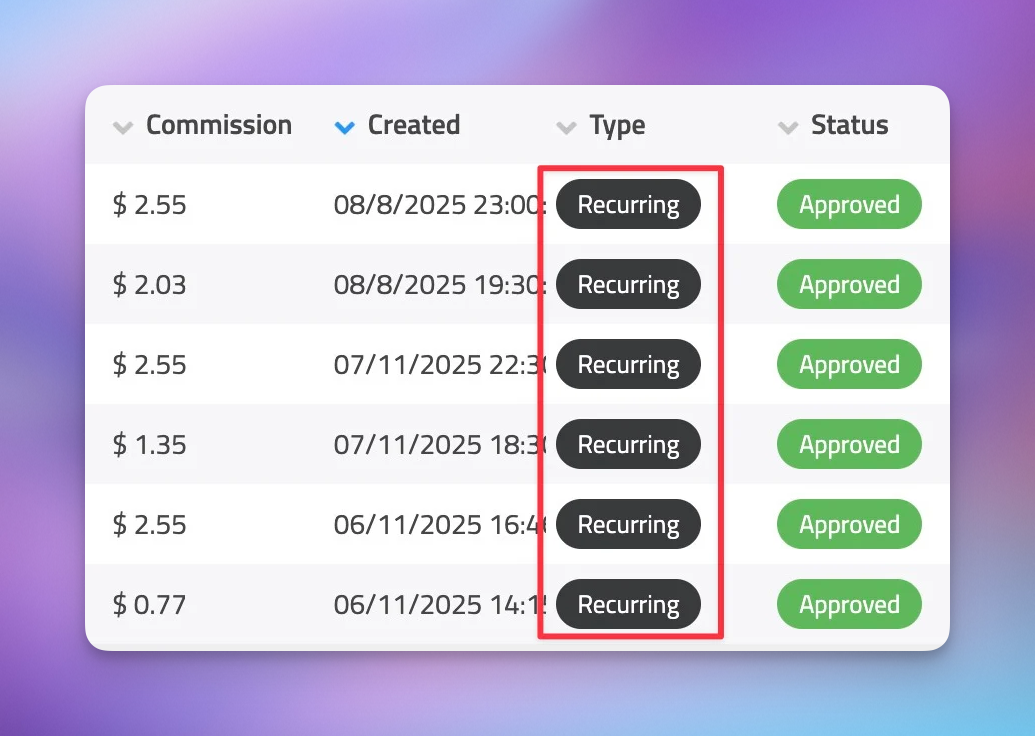
Here are the affiliate commissions I have earned from Elegant Themes so far.

Cloudways and Kinsta are other affiliate program providers in the WordPress space that offer attractive commissions.
Before you join an affiliate program, always answer the following questions first:
- Does the affiliate program offer recurring commissions?
- Is the product good enough to recommend to your audience?
- What about the developer reputation?
- How will you get paid?
If you are okay with non-recurring affiliate commissions, consider the number of dollars you will get for a successful affiliate sale.
Most hosting providers don’t offer recurring commissions, but they offer high commission per sale ($100+ per sale on average). So, joining the affiliate programs of hosting providers is still worth your effort.
Based on my experience, here are some of the best affiliate programs in the WordPress scene and SaaS industry:
Affiliate Program | Reasons |
---|---|
Elegant Themes | Lifetime recurring commissions, high commissions (50%), supportive affiliate manager, plenty of products to promote on Divi Marketplace. Learn more |
Kinsta | Lifetime recurring commissions, intuitive affiliate dashboard, reputable hosting service. Learn more |
Rapyd Cloud | Lifetime recurring commissions, intuitive affiliate dashboard. Learn more |
MailerLite | Lifetime recurring commissions, super clean affiliate dashboard, monthly billing cycle. Learn more |
Cloudways | Lifetime recurring commissions, monthly billing cycle. Learn more |
3. Install Display Ads
A display ad is a type of ad shown to users in a display format. A display can be an image, video, or animated GIF.
Installing display ads can be another alternative to add an extra revenue source on your blog. However, your website needs to have a huge number of visitors.
On average, your website needs to have at least 50,000 monthly visitors in order to be able to earn decent money on a monthly basis.
You don’t need to look for an advertiser yourself if you want to monetize your blog using this method. Instead, you can join programs like Google AdSense, Mediavine to BuySellAds.
Here are some programs you can join if you want to install display ads on your blog:
- Google AdSense
- BuySellAds
- Mediavine
- Media.net
- Ezoic
How do you get paid if you install display ads?
It depends on the program you join. But in general, you will earn money for every ad clicked and viewed (impression).
Google AdSense is an example of an advertising program that pays you based on the above conditions.
4. Sell Paid Content
To be honest, this monetization model is not the best one for a new blogger. Not because of a lack of knowledge or something. But rather, a new blogger commonly doesn’t have a good enough level of confidence.
It took me years before I eventually was confident enough to sell my knowledge. But it’s me and you don’t have to be me.
If you are confident enough about your level of knowledge, you can offer paid content to your audience.
There are several ways to offer paid content to your audience. One of which, you can charge a monthly or yearly subscription fee to your audience.
Or you can protect your content with a password and require your audience to pay to get the password. You can use a third-party platform like Gumroad or Lemon Squeezy to handle the payments and send the password automatically if you want to adopt this method.
If you prefer the membership method, you can use one of the following plugins:
- ProfilePress
- Paid Membership Pro
- Restrict Content Pro
One crucial thing to note if you prefer not to use one of the above membership plugins. Make sure the plugin you want to use has a built-in payment feature.
Getting Traffic to Your Blog
Search engines, Google in particular, are the primary organic traffic sources for bloggers. However, you need to understand that Google is not the only traffic source.
Relying on Google too much is not good for your blog because a single algorithm update from Google can put you out of business if you don’t have a traffic source backup. This kind of threat happened to many bloggers in 2023 when Google released a major algorithm update known as Helpful Content Update.
To avoid traffic plunge when Google plays its game, you can build an email list. Email is the best traffic source because email is a protocol. Meaning that no party controls it.
In general, there are three traffic types in online business:

Traffic You Earn
Traffic you earn is the type of traffic you get naturally from the internet. Be it from search engines or social media. It is a type of free traffic.
From search engines, you get free traffic via a process called Search Engine Optimization (SEO). From social media, you get free traffic when someone willingly shares your blog posts.
Traffic you earn is great because it is free. But it is not easy to get free traffic. Especially for a new blog. Usually, it takes months or even years to get your first dollar if you rely on this type of traffic for a new blog.
For immediate results, you can use paid traffic (traffic you control) while building a strong traffic foundation by publishing high quality blog posts on a regular basis.
Once you have enough organic traffic from your blog posts, you can stop the paid traffic.
More About SEO
For a long run, free traffic from search engines is the best because you don’t need to spend a dime for the traffic.
But again. Getting free traffic from search engines is not as easy as you think. You need to learn SEO.
But be careful because there is a lot of outdated SEO advice on the internet. If you find SEO content advising you to write keyword-filled articles, you better run away fast!
Modern SEO techniques don’t focus on keywords. Instead, it focuses on the topic.
Also, don’t waste your time and energy on link building because backlinks don’t work like they used to be.
Instead of chasing backlinks, you can focus on writing high quality, optimized blog posts.
By the way, I have published dedicated content you can read if you want to learn more about how to write SEO friendly blog posts. Click the button below to access it.
Traffic You Control
Traffic you control is the type of traffic you get by paying a certain platform to drive traffic to your blog. Called so because you can instruct the platform to direct the traffic to a specific page on your blog.
Also, you can control the traffic volume using your budget. If you want more traffic, you can simply increase your budget.
If you want immediate results, I strongly recommend you use this type of traffic.
So far, Facebook is the best platform to get paid traffic from because it is relatively more affordable. At least when compared to Google Ads.
I know. Using paid traffic is too risky if you are completely new to the blogging world. Especially if you have no experience in running paid ads yet.
To minimize the risk, you can adopt ad arbitrage practice.
What is that?
Ad arbitrage is the practice of driving paid traffic to your website while ensuring your earnings exceed your ad spend.
If you truly want to adopt ad arbitrage, you can create a dedicated blog post and install display ads on it. For maximum results you can incorporate affiliate links and paid content (if you have one).
This post (the one you are currently reading) is the perfect example of how to implement ad arbitrage.
Traffic You Own
I have two stories you can reflect on.
In 2020, Business Insider bought a majority stake of Morning Brew, valuing it at over $75 million.
If you look at the Morning Brew’s website, you will not believe it. $75 million for this website? You can create a website like that with WordPress!
But yes, it is the truth.
Want to know the secret?
Because Morning Brew had 1.8 subscribers on their email list. And today, it has over 4 million subscribers!
Of course, its valuation has also skyrocketed.
Another story — which I am pretty sure you have heard about.
Facebook bought Instagram for $1 billion in 2012.
I repeat. One billion dollars!
With all the resources they had, it’s super-duper easy for Facebook to clone Instagram. But they bought it instead.
Can you guess why?
Because Instagram had 50 million users.
50 million on their list.
List is the main highlight of the above stories.
Basically, every acquisition made by a business is aimed at gaining the list/database. Not the product.
If you want your blog to have high value, building an email list is a must. By having a solid email list, you will have more bargaining power when approaching big brands for a paid partnership.
Having an email list will also help much if you want to promote your own product or content.
Remember again. Email is a protocol. Your content delivery will not be filtered by the algorithm like social media.
You can use the following platforms to build an email list:
- MailPoet. The perfect solution of self-hosted email marketing platform. You can run the entire email marketing process from your WordPress dashboard with MailPoet. Read the review.
- MailerLite. An affordable email marketing platform. Comes with a solid automation feature. Read the review.
A Little Note About AI
I understand, you want to get the results quickly. Everyone does.
But you need to understand that no success is achieved overnight.
It’s true that AI (Generative AI more precisely) can help you produce content quickly in minutes. But you need to think long-term. Using AI to produce content is too risky for your business as you are more vulnerable to Google algorithm updates.
Google, and other search engines, don’t like AI-generated content. Also, think of this. No one wants to partner with you if your blog is populated by AI-generated content. Ever.
Instead of using AI to produce content, use your own words. Use your own writing style. Build a good reputation and you will have a good business long-term.
Summary
WordPress is the best blogging tool for one main reason: it’s super flexible. You can extend its functionality using plugins. When blogging with WordPress, you have limitless monetization options to adopt.
And if you don’t know which monetization methods you should adopt on your blog, you can narrow down your options to the following proven methods:
- Partnership
- Affiliate marketing
- Install display ads
- Sell paid content
The above monetization methods are evergreen. Meaning that they will always be relevant no matter the era.
There are many areas in WordPress you can cover. From design, security, e-commerce, optimization, blogging, and so on.
Starting a blog is just the beginning. You can use it as a launchpad to build your online business based on WordPress. Once your blog has high enough traffic and gains a good reputation, you can offer your own services or even products.
WordPress is a great free tool you can utilize to build a better life online.
How Much Does it Cost to Start a WordPress Blog?
Well, the answer to the above question always depends on the tools and services you use. If you use Hover, Cloudways and Divi, you need at about $18.99/month to start a professional blog with WordPress.
Here are the details:
Tool/service | Cost |
---|---|
Domain: Hover | $18.99/year ($1.58/month) |
Hosting: Cloudways | $11/month |
Theme: Divi | $89/year (7.41/month) |
Total | $19.99/month |
🚨 You can use the following button to get a 30% discount for three months in Cloudways.
CLAIM THE DISCOUNT
I want to end this post with a statement you can reflect on. Starting a new blog equals to starting a new business. And running a business is always challenging. But I can say that it will be the best ever adventure in your life.
You will be the boss. You can work on your own terms. And more importantly, you will have more time to spend with your family once your business is running and becomes profitable.
You can use this content as the shortcut to achieve success with your blog business.
Start today while you still have time. Always remember what Mark Twain said below.

Good luck with your blog project!
Feel free to reach me out if you have something to ask before starting your blog 🙂
🎁 I have put together all the resources you need to start a profitable blog on a dedicated page which you can access by clicking the button below.
ACCESS THE RESOURCES
Outstanding post! Your passion and creativity shine through in every detail of the post. It is truly inspiring to see.
This is wonderful! Just bookmarked it. Not really ready to start my blog at the moment TBH. But everything looks logical. The covered monetization methods are great to make money from a blog without interrupting readers with annoying banner ads IMO.
Thanks, Cliff.
Anytime you are ready, feel free to use my blog post as the guide 🙂
Hey Aliko. First, thanks for your article. So comprehensive. I have one question, though. Have you tried Google Adsense? How are you finding it?
Hey Shreesh.
Google AdSense is great, but it takes some time for a new blog until you can monetize your blog.
I didn’t know that there are affiliate programs that generously offer recurring commissions for their partners. I think this is a great opportunity to build the real passive income via affiliate marketing. Thanks for the brand-new insight!
Agreed. Everyone who has access to the internet has the equal opportunity to build passive income with affiliate marketing.
Thanks for the comprehensive article, Aliko. I am super convinced that blog still have room amid the content creation shift to short videos.
You are welcome, Pete. Same opinion. Every content format has their own audience. If you can find the audience for your content creation platform, then nothing to worry about.