You already know that you can extend the functionality of WordPress using a plugin. But have you ever heard about MU-plugins?
In this post, you will learn everything about MU-plugins in WordPress. From what is an MU-plugin, when to use one and how to create one.
MU-plugins are especially useful if you manage multiple WordPress websites under the same installation. You can use them to save your time when adding a new website.
Let’s start by getting to know what is an MU-plugin.
Shortcuts ⤵️
- What is an MU-plugin?
- MU-plugins vs regular plugins
- When to use an MU-plugin
- How to create an MU-plugin
- How to remove an MU-plugin
- Summary
What is an MU-Plugin in WordPress?
An MU-plugin is also called must-use plugin. They refer to the same thing.
In essence, an MU-plugin is not different from a regular plugin where it adds a certain functionality (or a feature) in a WordPress site.
However, there are some differences about how WordPress treats an MU-plugin.
In the WordPress system, an MU-plugin cannot be activated like a regular plugin. In other words, once an MU-plugin is installed, it will always be active until it gets removed manually.
An MU-plugin can only be installed manually by adding the plugin file to the mu-plugins folder under the wp-content folder (/wp-content/mu-plugins).
Once a plugin is added to the mu-plugins folder, WordPress will start to treat it as an active plugin. No manual activation is required like a regular plugin.
Although you can’t install an MU-plugin via the WordPress dashboard, you can find out the installed MU-plugins on your WordPress site from the dashboard.
On the Plugins screen, you will see a tab called Must-Use. This tab displays all the MU-plugins installed on your WordPress website.
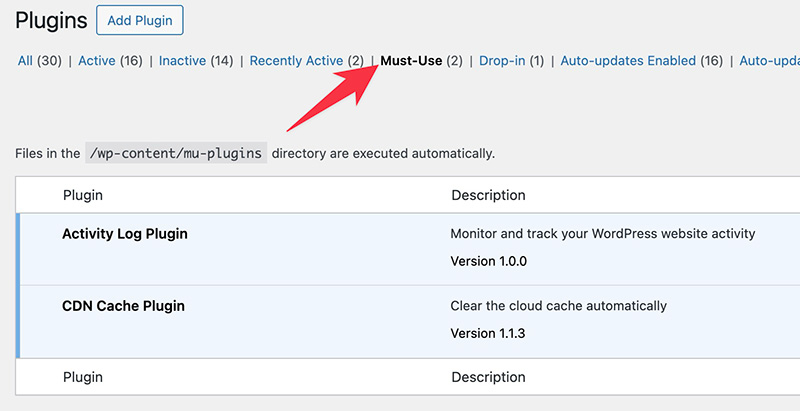
As you can see above, there are no action links to activate or deactivate the plugins on the tab.
A Brief History of the MU-Plugins
In 2010, along with the release of version 3.0, WordPress introduced a new feature that allowed multiple websites to be managed under one WordPress installation. The feature was called Multisite.
The version also introduced a new folder called mu-plugins (which you can find under the wp-content folder).
With the feature, an administrator can easily activate plugins by default on all sites in a multisite network.
One crucial thing to note. While MU-plugin was originally built for multisite WordPress installations, it also works on a single site WordPress installation.
In fact, there are many today’s hosting providers that deploy their companion plugins as MU-plugins instead of regular plugins to make sure all of their hosting features work properly.
Rocket.net, for instance, uses an MU-plugin to connect a WordPress site hosted on it to its CDN feature.
MU-Plugins vs Regular Plugins
In an MU-plugin, everything is manual. You can only install it manually. You can only remove it manually too.
If you want to edit the file of the plugin, you also need to do it manually. Either using file manager or using FTP.
Here are some key differences between MU-plugins and regular plugins:
| MU-Plugins | Regular Plugins | |
|---|---|---|
| Always on | ✅ | ❌ |
| Can be deactivated | ❌ | ✅ |
| Auto update | ❌ | ✅ |
| Files are editable via WP dashboard | ❌ | ✅ |
| Requires manual installation | ✅ | ❌ |
When Should You Use an MU-Plugin?
Ideally, you use an MU-plugin on a multisite WordPress installation because you can create a custom plugin and set it as a default feature on every website you manage.
When the plugin is updated, the changes will be applied to all sites under the installation. Save time.
What if all you have is a single site installation?
In single site WordPress installation, using an MU-plugin is a good fit if you want to add a small feature or functionality to your WordPress.
Say you want to replace Gutenberg with Classic Editor. Instead of installing a new plugin (Classic Editor), you can create a custom plugin and place it in the mu-plugins folder because it takes only a single line of code to bring the Classic Editor back in WordPress.
It’s true that you can add a custom function by editing the functions.php file of your theme. But you also know that it’s not a permanent solution because your custom function will be gone when you update your theme.
So, using an MU-plugin is a smarter solution to add a custom function to your WordPress site.
How to Create an MU-Plugin in WordPress
Creating an MU-plugin is not different from creating a regular WordPress plugin. You can use only a single PHP file or a set of PHP files under a certain folder.
I personally use a single PHP file to host multiple custom functions because I hate installing plugins for tiny features.
In this post, I will show you how to create an MU-plugin to exclude pages from the search results page of WordPress.
Here are the steps:
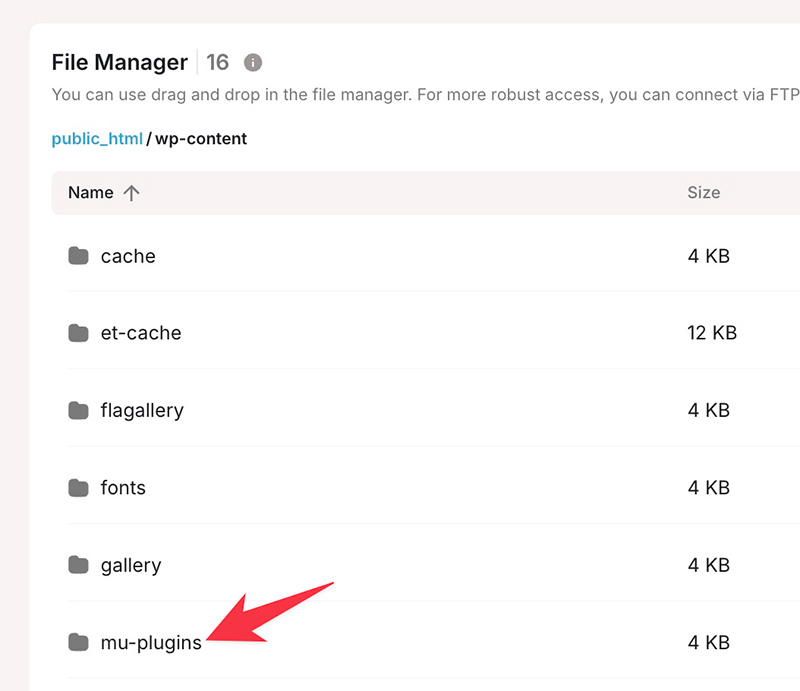
Step 1: Create a Folder Called “mu-plugins”
MU-plugins are plugins stored in the mu-plugins folder. So, before you step even further, you need to make sure that the folder exists on your WordPress site.
In most cases, the folder already exists the moment you install WordPress but some hosting providers may remove it.
If the folder does not exist, you need to create it manually. To do so, simply go to the wp-content folder on your WordPress installation and create a new folder called mu-plugins.
To create the folder itself, you can use FTP, file manager or even via command line. It’s totally up you.
Step 2: Create the PHP File of the Plugin
Once the folder is ready, you can start to create the PHP file of the plugin.
Unlike regular plugins which require you to add a plugin header, you can create an MU-plugin without a header.
Plugin header itself is a specially formatted PHP comment block at the beginning of the main plugin file containing information about the plugin.
Although you can create an MU-plugin without a header, I strongly recommend you to add one (especially the description line) because it makes it easier for you to learn what the plugin does.
To create the PHP file itself, you can use any editor. From the default text editor of your operating system to an advanced code editor like VS Code.
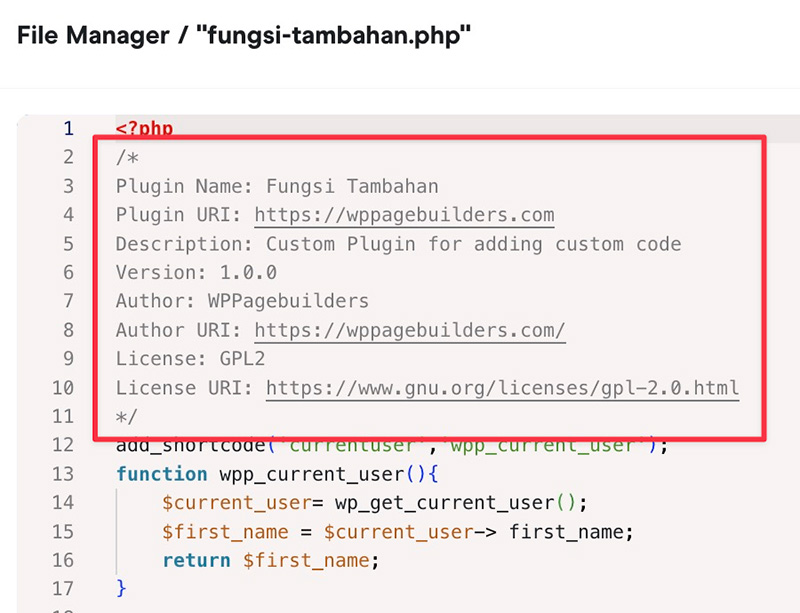
Start your PHP file with the opening tag (the <?php tag), followed by the plugin header and your custom code. The closing tag is not necessary.
For a plugin to exclude pages from the results page, the content of the PHP file looks like this:
/*
Plugin Name: My mu-plugin
Description: Custom plugin to hide pages from search results.
Version: 1.0.0
Author: UtilizeWP
Author URI: https://utilizewp.com/
License: GPL2
License URI: https://www.gnu.org/licenses/gpl-2.0.html
*/

if (!is_admin()) {
  function search_filter_pages($query) {
    if ($query->is_search) {
  $query->set('post_type', 'post');
}
  return $query;
}
  add_filter('pre_get_posts','search_filter_pages');
}
function example_theme_support() {
    remove_theme_support( 'core-block-patterns' );
}
add_action( 'after_setup_theme', 'example_theme_support' );
Save the file with the extension of .php (e.g., my-plugin.php).
Step 3: Install the Plugin
The next step to do after you are done creating the plugin file is to install the plugin.
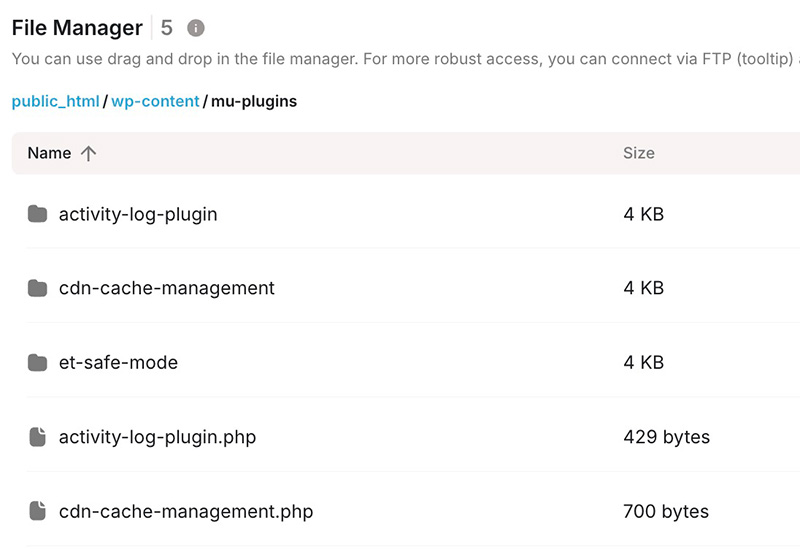
You can install the plugin by uploading the file to the mu-plugins folder you prepared on step one above.
To upload the file itself, you can use any medium. Whether using FTP or using file manager.
If you want to use file manager and your hosting doesn’t have one, you can install a file manager plugin like Filester and WP File Manager.
If you want to use FTP to upload the plugin and still don’t know how to do so, we have a separate article covering how to use FTP to upload and download files in WordPress. Give it a read to learn more.
Once the file is in place (in the mu-plugins folder), WordPress will start to treat it as an active plugin.
You can try the changes to find out whether your MU-plugin works.
How to Remove an MU-Plugin
If you no longer need an MU-plugin you have created, you can remove it to make your WordPress site lightweight and fast.
Unlike regular plugins that can be removed via the WordPress dashboard, an MU-plugin requires manual file deletion if you want to remove it from your WordPress site.
Same as installing/uploading, you can also use FTP or file manager to delete the file of the plugin.
Simply go to the mu-plugins folder, find the MU-plugin you want to remove and then delete the file.

Summary
MM-plugin is a useful WordPress feature that not everyone knows about. One of the best use cases of it is to add custom functions.
It’s true that you can simply edit the functions.php file of an active theme to add custom functions, but it’s not a smart method because the moment you update your theme, your custom functions are gone.
If you have a multisite WordPress installation, using MU-plugins is even a smarter move. You can create an MU-plugin and set it as a default feature on the websites you maintain. Save time.
Creating an MU-plugin itself is quite easy because you only need to upload a PHP file to the mu-plugins on your WordPress installation.


