Creating a staging website is a smart move if you want to make changes to your WordPress. You can test any change without worrying about your live site because the changes won’t be applied until you push them.
If you are not familiar with a staging site yet, this post will cover everything you need to know about it. From what it is to how to create one.
A staging site is not required, but it is super beneficial for a business website. Especially a website that involves users’ interactions. It can minimize the risk of site malfunction when you are making some changes.
Shortcuts ⤵️
- What is a staging site?
- When should you create a staging site?
- Plugins to create a staging site
- Creating a staging site in Cloudways
- Summary
So, What is a Staging Site?
A staging site is nothing more than just a clone of a live website). It is generally created to test changes before making them live.
When the changes are tested on a staging site and some errors occur, the live site will not get affected because the changes only take place on the staging site.
That’s why creating a staging site is super important if you have a business website. Your website will run normally when errors happen during testing on the staging site.
Once the changes are good, you can make them live by pushing them to your live site.
Testing changes on a staging site is more efficient than testing changes on a local site because in some cases, things are not running smoothly on a local environment.
Also, if you test changes on a local site, you need to manually upload the changes via FTP (unless you have set up Git).
When Should You Create a Staging Site?
A staging site is created to test new changes on a website. Be it design changes, features changes or functionality changes.
So basically, you can create a staging site anytime you want to make new changes to your website.
Even if you want to make a minor change like changing a color, testing it on a staging site first is important if your website has gone live and already have a massive audience or user base.
Let alone if you want to make major changes like design overhaul or you want to add a certain feature be it via a plugin or custom code.
Here are some of the best situations where the implementation of a staging site is crucial:
- When you want to install a new plugin
- When you want update WordPress core, themes, and plugins
- When you want to test custom code
- When you want to overhaul your site design
Well, you can do all the things above directly on your live site.
But again. For a business website, every little change matters. So, it’s extremely crucial to make sure every change you make work flawlessly.
WordPress Plugins to Create a Staging Site
Some hosting providers offer the ability to create a staging site as a built-in feature. However, some of them are not really useful.
On some hosting services, you need to create a new staging site every time you want to test a change on a staging site.
As a comparison. In Cloudways, you only need to create a staging site once and use it forever. That’s because in Cloudways, you can pull the changes from the live site apart from pushing the changes to it.
What if your hosting provider offers no staging site feature?
Some backup plugins like WPvivid and WP Time Capsule come with a feature that allows you to create a staging site. There are also some plugins designed specifically to create a staging site.
Here are some plugins that you can use to create a staging site.
- WP Staging
- WP Stagecoach
- UpdraftClone
- WP Time Capsule
- WPvivid
Creating a WordPress Staging Site in Cloudways
Cloudways is one of the hosting services that has the best staging site feature. As I mentioned above, in Cloudways, you can create a staging site once and use it as long as your site is still around.
You don’t need to create a new staging site to test new changes. Instead, you can simply pull the changes from the live site to the staging site to get the latest version of your site.
Once you are done making the changes on the staging site, you can push them back to the live site with a single click.
You can jump to this section to learn more about the staging feature of Cloudways.
🚨 You can get a 10% discount for three months on Cloudways using the following promo code. Use the code ASAP before it expires.
Promo code: WPBDEAL
use promo code
Steps to Create a Staging Site in Cloudways
Before you start to create a staging site in Cloudways, make sure you already have a live site on your Cloudways server.
Also, I strongly recommend that your server configuration has at least the CPU cores of 2 and the RAM of 4GB.
Here are the steps to create a staging site in Cloudways.
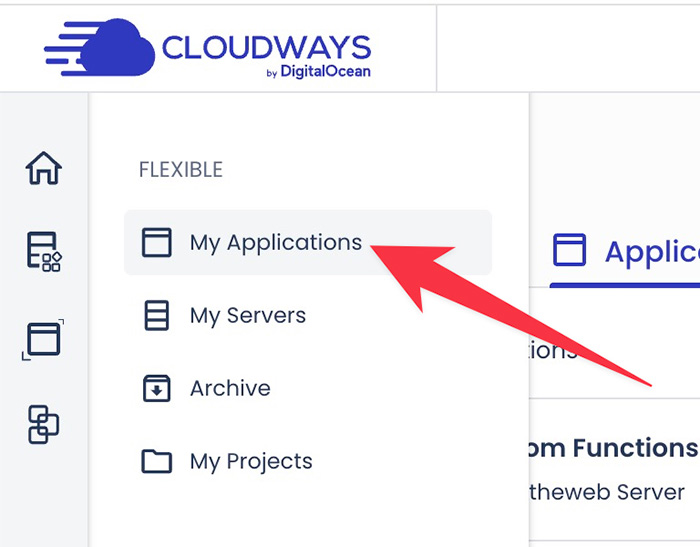
First, login to the Cloudways dashboard and go to the Applications panel.
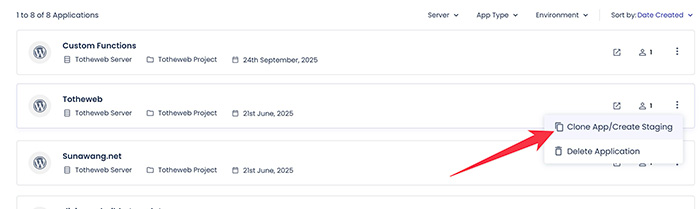
Specify the website you want to create the staging site of. Click the three-dot icon and select Clone App/Create Staging.
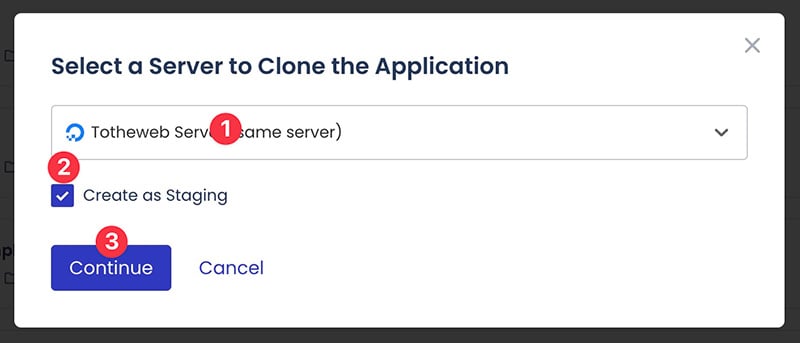
On the appearing popup, select a server where you want to install the staging site on from the dropdown menu and tick the Create as Staging option. Click the Continue button.
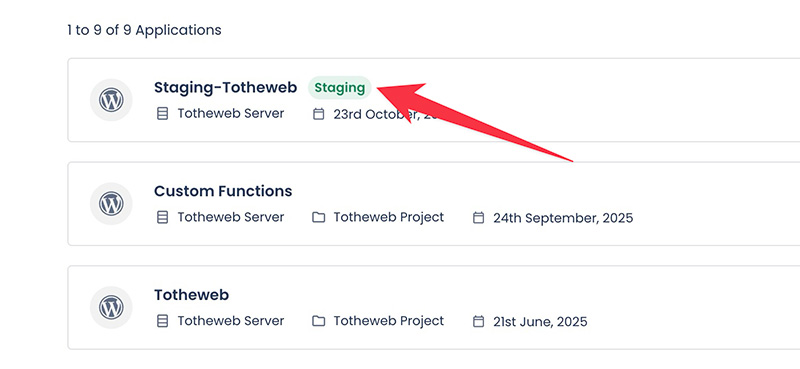
Wait while Cloudways is creating the staging site. Once done, you can start to use it to test the changes you want to make.
Accessing the Staging Site and Test Some Changes
It takes around 2 minutes for Cloudways to create a staging site, depending on the size of your website.
Once the staging site is created, you can start to use it to test the changes you want to make to your website.
To access the staging site itself, you can go to the Applications panel on the Cloudways dashboard. You should find a new site labelled Staging.
You can simply click on the site to manage it. On the Access Details tab, you can find the login details and the URL to access the staging site.
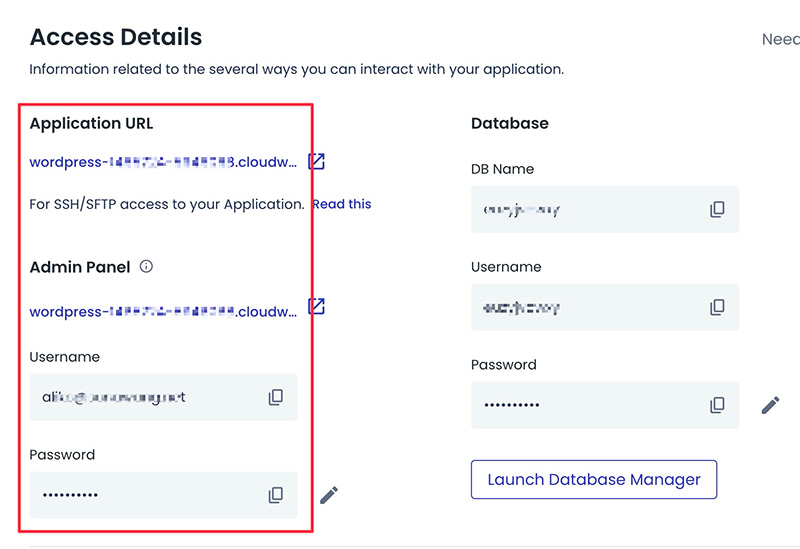
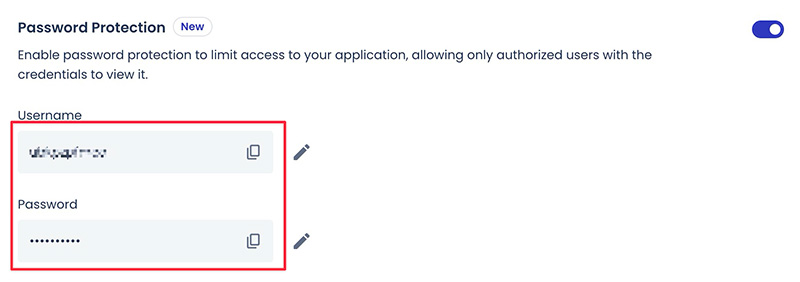
Your staging site is not visible to the public, unless they know the URL. If you want to make it completely inaccessible by the public, you can password-protect it.
By default, Cloudways already password-protects your staging site. You can edit the username and password on the Password Protection section under the Access Details tab.
If you want to test some changes on your staging site, simply do it. Login to your WordPress dashboard and change anything you want to change.
Once you are done making the changes and everything works well, you can push the changes to the live site.
Continue below to learn how.
Pushing and Pulling the Changes from and to the Staging Site
The changes you made on the staging site won’t take place on the live site until you push them. So, how to push the changes?
On your staging site, you can go to the Staging Management tab. On this tab, you can find two buttons. One to push the changes from the staging site to the live site. The other one to pull the changes from the live site to the staging site.
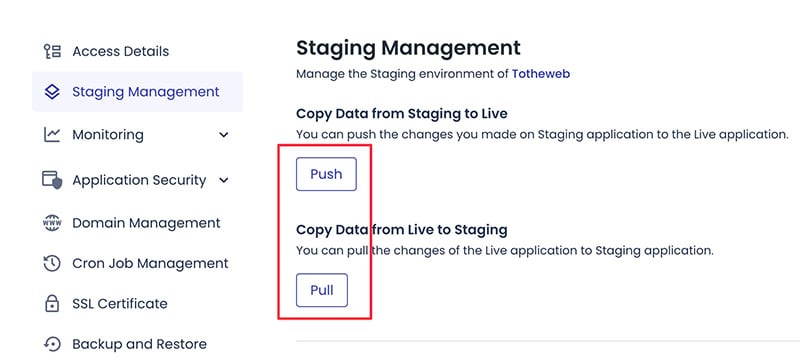
Pushing the Changes
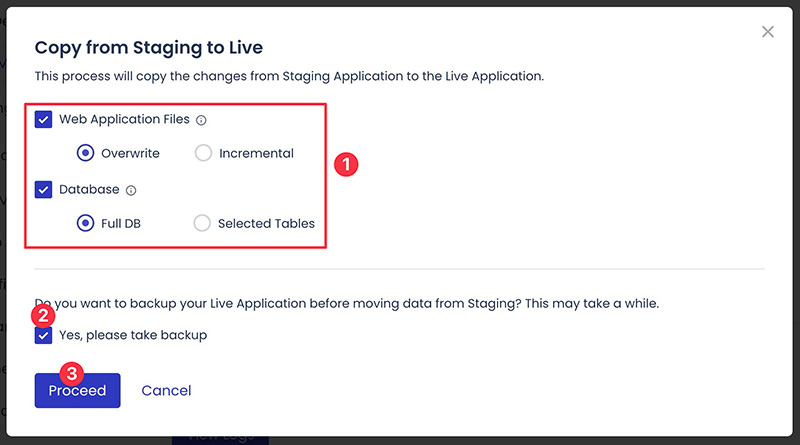
To push the changes from the staging site to the live site, you can click the Push button. A popup dialog will show up after you click the button.
You can choose whether you want to push the site files and database or only one of them. For the site files, you can also select the synchronization method (overwrite or incremental).
If you want to create a backup of your live site before pushing the changes, you can tick the Yes, please take backup option. Click the Proceed button to start pushing the changes to the live site.
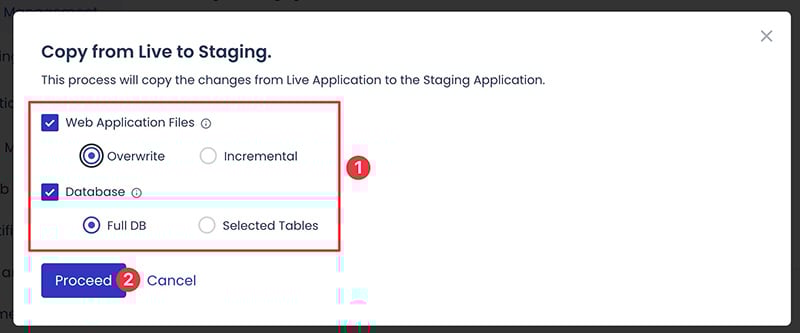
Pulling the Changes
If you want to bring the latest version of your live site before you make changes on the staging site, you can pull the changes from it.
To do so, simply click the Pull button. On the appearing dialog, you can select which components you want to pull to the staging site, as well as the synchronization method.
Click the Proceed button to pull the changes.
Wait until Cloudways is done synchronizing your live site and your staging site. Once done, you can start to make the changes on the staging site and push them back to the live site.
Summary
Every change you make to your website, even a small change, has a potential to break your website. You cannot let that happen if you have a business website. Especially if you already have an established brand.
A smart option you can take to eliminate the risk is to clone your website to a different environment: the staging environment.
Creating the staging site of your WordPress site is extremely easy because most hosting providers have a built-in feature to do so. If you use a hosting provider that doesn’t have the feature, you can use the plugin approach.
Cloudways is a hosting provider that has one the best staging features. Your staging site will be installed with the same server resources as your live site.
Also, you can push and pull the changes from and to the staging site, which is great because you don’t need to create a new staging site every time you want to make changes to your site.


