Git is a popular tool widely used by professional developers. Even if you are not a professional developer, using Git can still be beneficial to manage your WordPress site.
In this post, I will so you how to use Git and integrate it on your WordPress development workflow.
I will also show you how to integrate your WordPress site with GitHub and demonstrate how to use the integration to manage a custom plugin.
Let’s start by getting to know better about Git.
Shortcuts ⤵️
- What is Git and how it works
- What is the difference between git and GitHub?
- Setting up local environment
- Installing Git
- Creating Git repository
- Connecting your WordPress website with GitHub
- Summary
What is Git and How it Works
Git (which stands for Global Information Tracker) is a version control system created by Linus Torvalds, the man who also created Linux.
Linus created the tool to replace BitKeeper, the version control system he previously used to manage the versions of Linux kernel.
The reason Linus created Git was because the copyright holder of BitKeeper revoked the free license for BitKeeper he used so he had to find another solution and Git was born.
As a version control system, Git helps developers keep track of changes made to their code (or files) over time.
If you want to learn more about Git, the official site of Git is accessible on git-scm.com.
— How Git Works
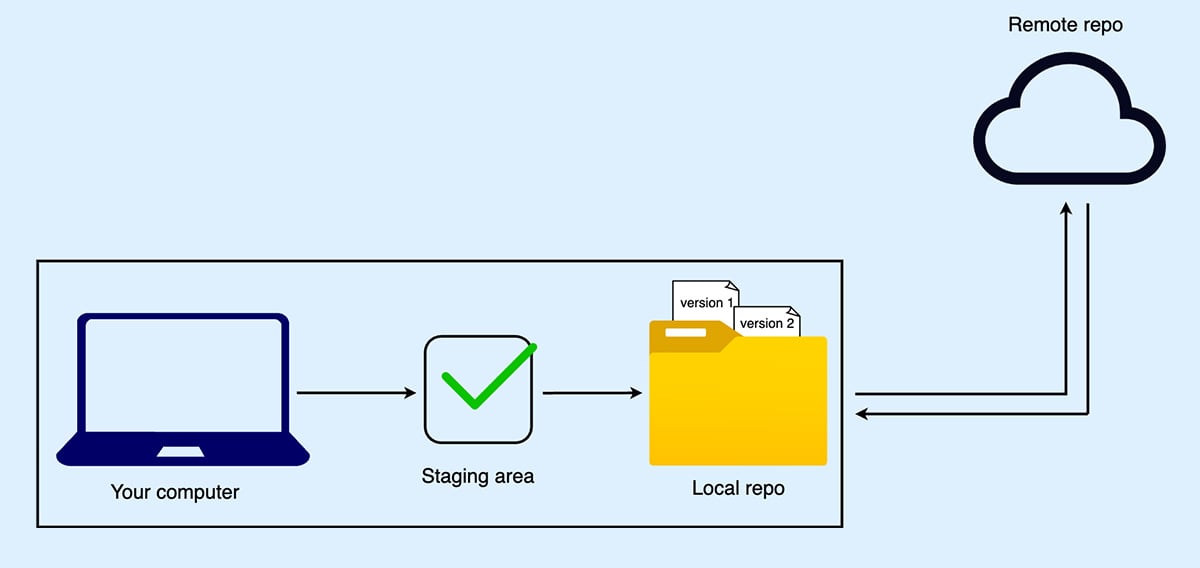
In Git, every file and folder related to a project is stored in a folder called repository (or simply repo). You can think of it (the repo) as a master folder where Git monitors all project files.
Git is commonly used by a distributed team of developers who work on a project remotely.
They usually have two versions of their repository: the offline version (local repo), which is stored on the computer of each team member, and the online version which is stored on the cloud (remote repo).
You can also use Git without creating an online repo, however. You can use Git completely offline.
In Git, the online version of the repo plays a role as the hub for the project files.
Each team member can edit a certain file offline and push the latest version of the file (after being edited) to the hub (e.g. GitHub). Other team members can then get the latest version of the same file by pulling it from the hub.
What is the Difference Between Git and GitHub?
Those who are new to Git usually have a misunderstanding between Git and GitHub. The two are completely different things.
As I said above, a team that uses Git on their development workflow usually has two versions of their repo: local repo and remote repo.
GitHub is an online platform where you can create a remote repo, while Git is the tool that tracks changes in your code within the repo.
Apart from allowing you to create a remote repo of your project, GitHub also offers other features to support your project development.
Simply put, you can use Git without GitHub. But GitHub can’t work without Git because it totally relies on it.
— Alternatives to GitHub
The involvement of GitHub is not required if you want to use Git for your project development. You can even keep everything offline on your own computer.
If you need to create remote repo but are not interested in using GitHub, you can try the following alternatives:
Setting Up Local Environment
This step is not required but highly recommended. By setting up a local environment, you can make any changes to your code more freely without needing to worry about your live site.
That’s because the changes won’t apply on the live site until you push it.
But more importantly, setting up a local environment allows you to test the changes you have made on your computer before you push them to the remote repo (if you use one).
What’s local environment, by the way?
Local environment is the setup on your computer where you can run your project without an internet connection. In the context of WordPress, the setup should include at least three components:
- Web server (Apache, Ngix, etc.)
- Database server (MySQL or MariaDB)
- PHP processor (included in web server in most cases)
— Recommended Tools to Create a Local Environment for WordPress
There are several tools that you can use to create a local environment to run a WordPress website locally. Depending on the operating system you use.
Here are two most recommended tools that you can use to create a local environment to WordPress locally:
If you are a Linux user, I strongly recommend you to install Apache and MySQL or MariaDB manually. You can use XAMPP, actually, but it is not stable enough on Linux.
The same applies if you are a macOS user. Instead of XAMPP, I strongly recommend you to use MAMP which is more stable.
I have published a tutorial on how to run WordPress locally using XAMPP you might want to read.
Installing Git
Once you are done creating the local environment to run WordPress on your computer, the next step you need to do is to install Git.
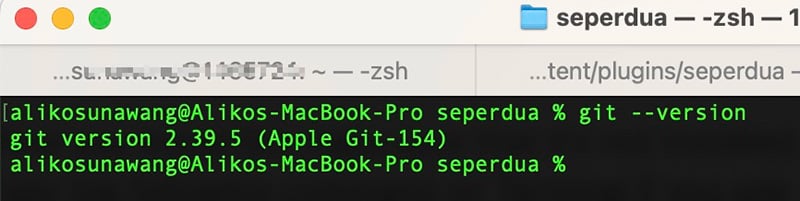
Before you install Git, make sure that it’s not installed yet on your computer. To do so, you can simply run the following command on Terminal if you are a macOS or a Linux user.
If you are a Windows user, you can type the command on CMD (Command Prompt).
The command:
git --versionIf Git is already installed, you should see the following output:
— Installing Git on macOS
There are several ways to install Git on macOS. The most common one is using Homebrew.
Homebrew itself is a CLI-based package manager for macOS. It is not installed on macOS by default. In other words, you need to install it first.
To install Homebrew, you can type the following command:
/bin/bash -c "$(curl -fsSL https://raw.githubusercontent.com/Homebrew/install/HEAD/install.sh)"After running the above command, you will be asked to run three additional commands to complete the installation. Simply run the commands and Homebrew will be ready to use:
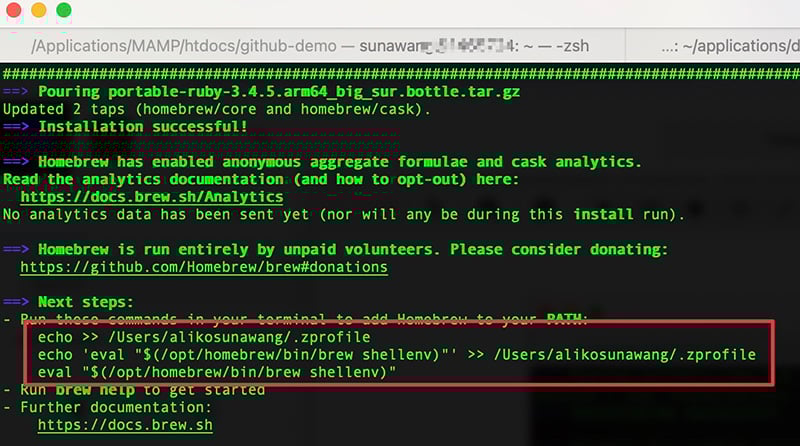
Once Homebrew is installed, you can type the following command to install Git.
brew install git— Installing Git on Linux
As you already know, there are tons of Linux distros. So, the method to install Git will depend on the Linux distro you use.
In this post, I will show you how to install Git in Ubuntu.
In Ubuntu, you can install Git using apt-get, the default package manager of Ubuntu. You should also use apt-get on other Debian-based Linux distros.
To install Git in Ubuntu, you can type the following command:
sudo apt-get install gitYou don’t need to include the prefix of sudo if you already login as root.
— Installing Git on Windows
Installing Git on Windows is the easiest one because Git provides a GUI-based installer. You can download the installer file from this page.
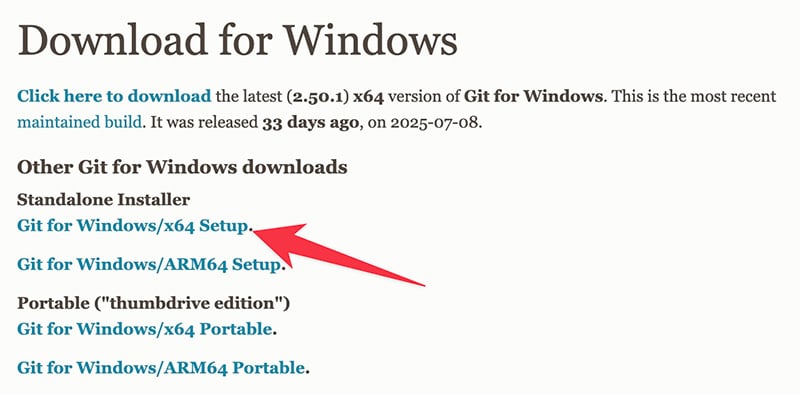
Simply double click the installer file once downloaded and follow the steps on the installation wizard.
Git Commands
Before using Git, you definitely need to know the commands that Git supports. On the next steps below, I will show you some commands to get started with Git.
Git, just like other CLI-based tools, comes with useful documentation. As soon as Git is installed on your computer, you can run the following command to learn more about Git commands.
git --help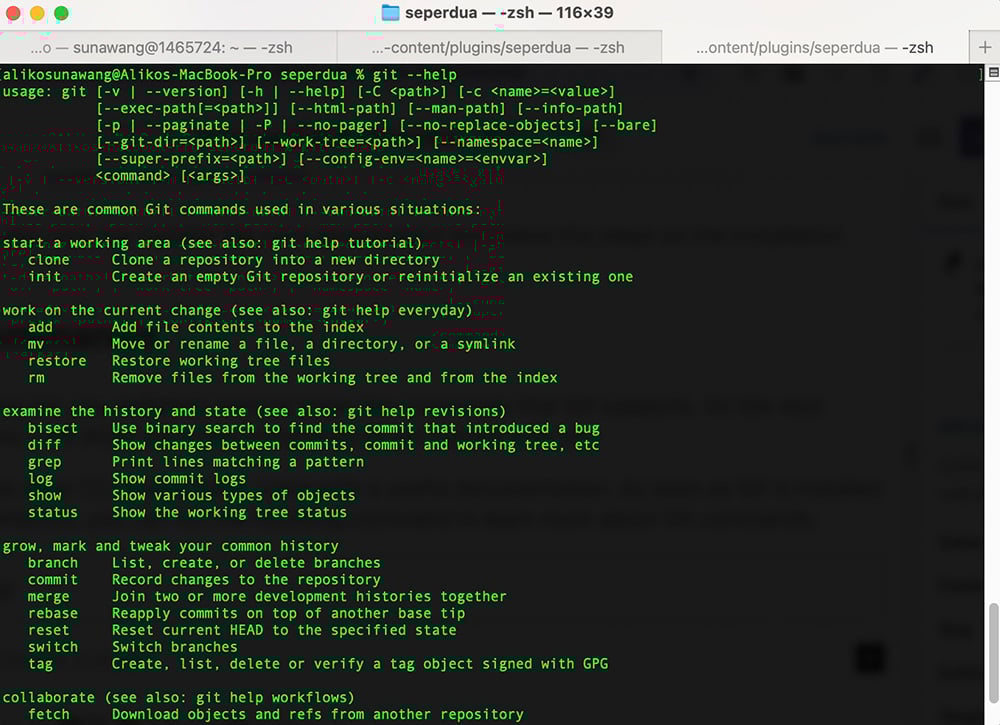
Creating Git Repository
Git is already installed on your computer so you can start to use it. The very first step you need to do before you step further with Git is to create a repo.
— Creating a Local Git Repo
Before running a Git command to create a local repo, first, you need to go to the folder of the project you are working on (a theme or plugin).
Say you are working on a plugin called seperdua. Then your path will be:
- root_folder/your_site/wp-content/plugins/seperdua
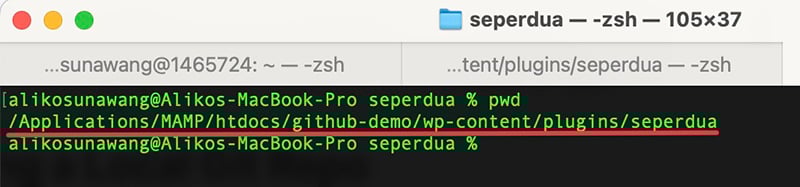
By the way, you can use the standard cd command to move between folders on Mac.
Once you are already on the folder of your project, you can run the following command to create an empty Git repository on your computer.
git init
Next, you need to run the following command to stage file changes (make sure to include the dot).
git add .
You should now see a hidden folder called .git on your project folder.
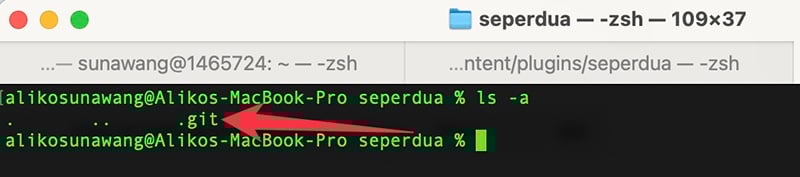
Inside this hidden folder, you will find other folders and files belonging to Git.

— Creating a Remote Git Repo on GitHub
Your local repo is ready. Now is the time to create a remote repo on GitHub and connect it to your local repo later.
Before you can create a repo on GitHub, you definitely need to have an account first. Simply create your account on GitHub.
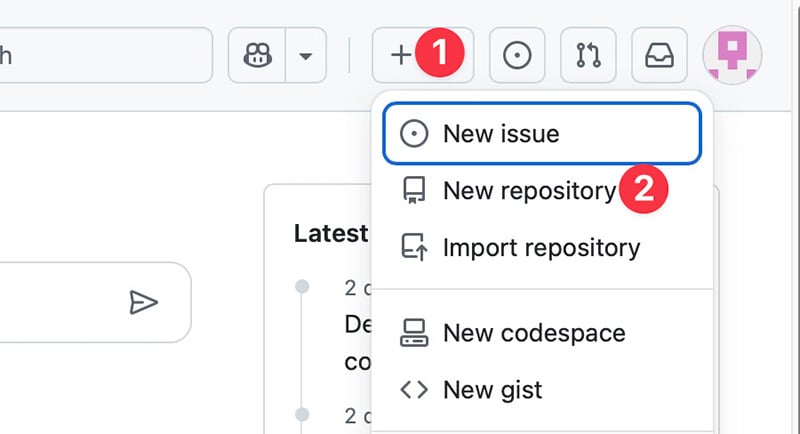
Once your account is ready, you can start to create the repo. To do so, click the plus icon on the icon bar and select New repository.
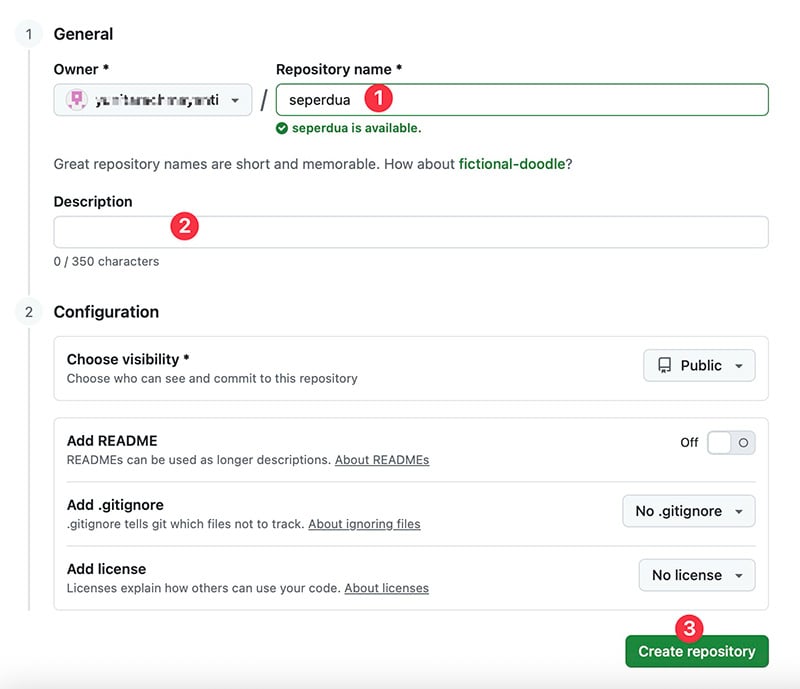
Give your directory a name and add the description (optional). Click the Create repository button.
Next, you need to create an access token to allow you to connect the repo you have just created to your local repo.
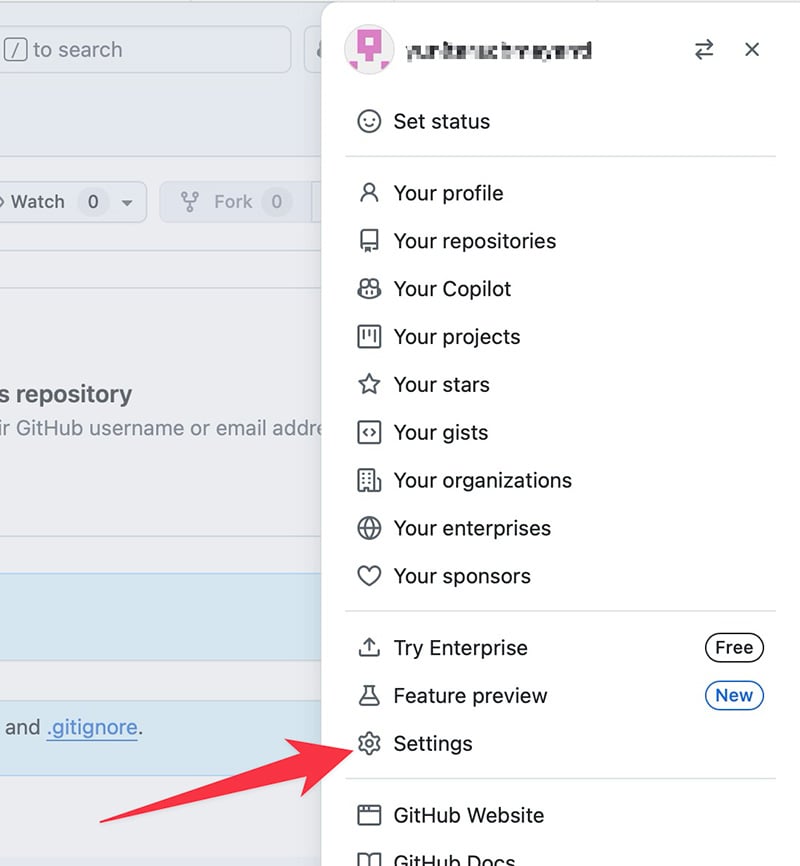
To create a token access, click your profile image at the top-right corner and select Settings.
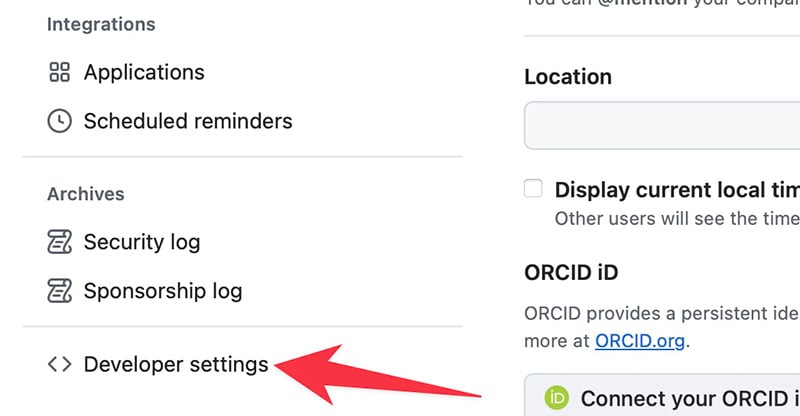
Click the Developer settings menu on the settings screen.
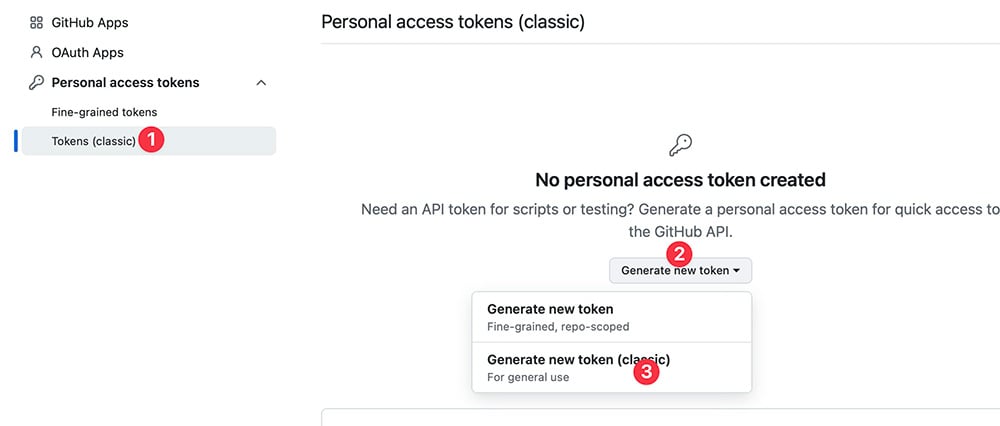
On the Developer Settings screen, select the Tokens (classic) option under the Personal access tokens. Click the Generate new token button and select Generate new token (classic).
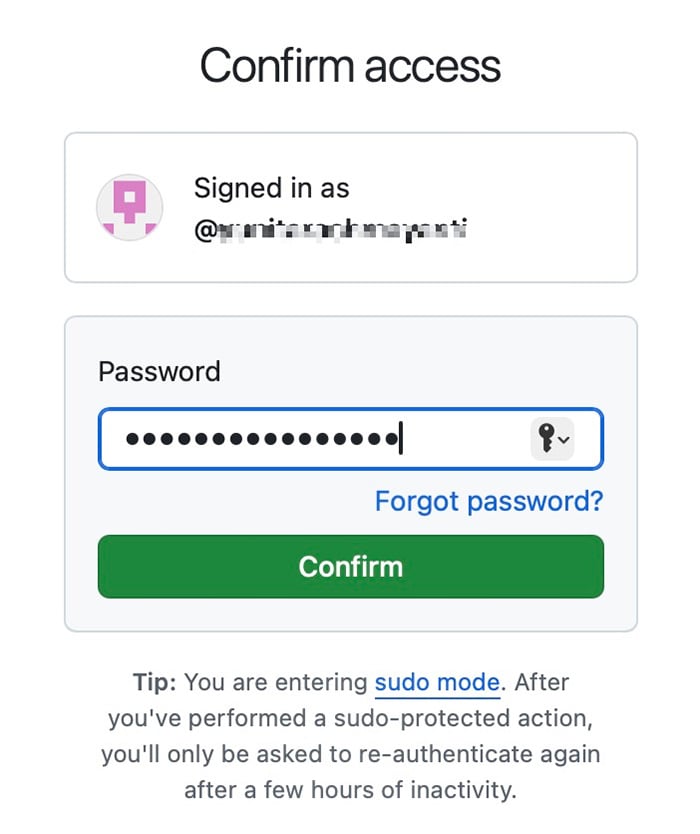
On the next step, you will be asked to enter your GitHub account password. Simply enter your password and hit the Confirm button.
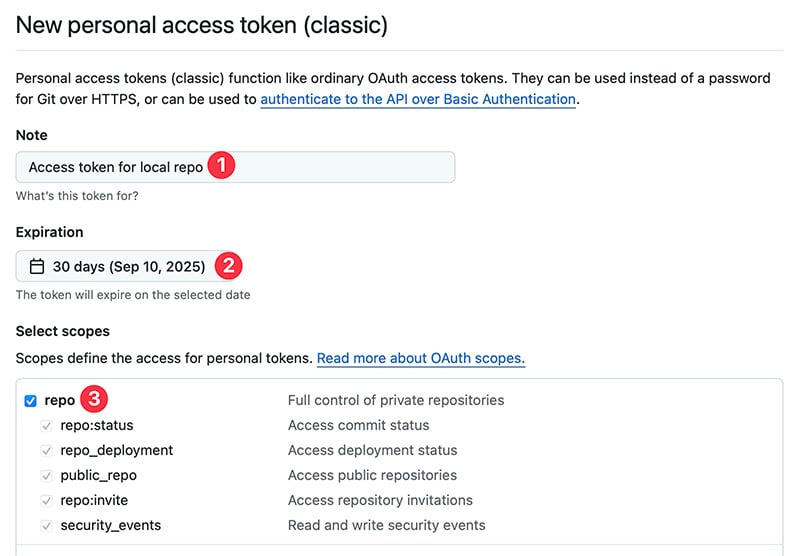
Add a note about your token and set the expiration duration. On the Select scopes section, check the repo option.
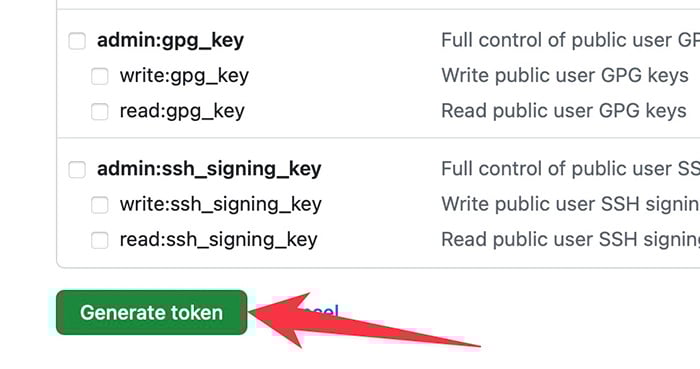
Scroll down to the bottom and click the Generate token button.
Copy the generated access token and save it to a safe place. You will need this token to connect your GitHub repo to your local repo.
A little tip. If you use a password manager and it has a note feature, you can add the token as a note.
— Pushing Local Files to GitHub
You already have both the local repo and remote repo on GitHub. The next step is to connect them so that you can push local files to remote repo. And vice versa.
Before you start, you need to copy the URL of your remote repo. To get the URL of the remote repo on GitHub, click your profile image at the top-right corner and select Your repositories.
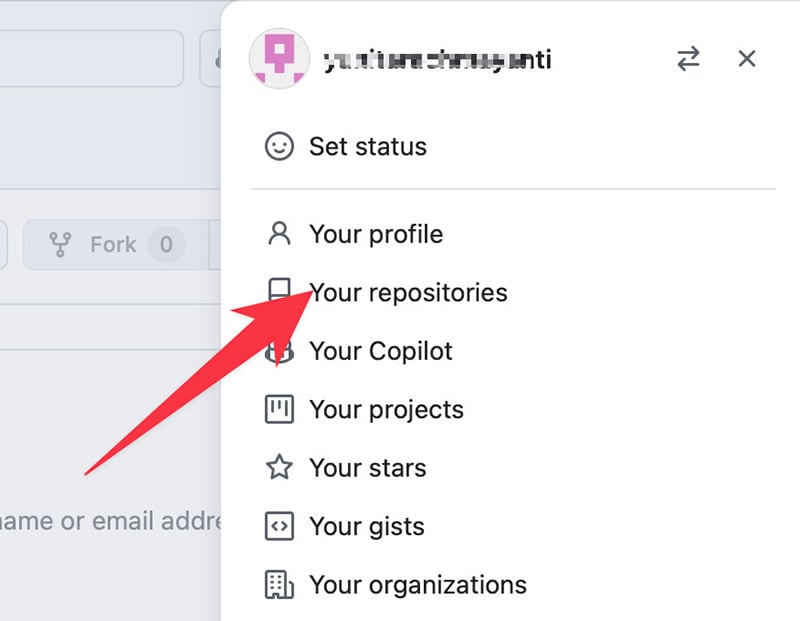
Select the repo that you want to connect to your local repo. You can find the repo URL on the Quick setup section under the Code tab.

Next, run the following command. Make sure to run it from your project folder and replace “URL” with the actual URL of your repo.
git remote add origin URL
After that, you need to run the following command to push the files on your local repo to GitHub.
git push -u origin mainGitHub will ask you to enter your username and password. On the Username field, you can type your GitHub username.
On the Password field, you can paste the access token (not your GitHub password) you have created earlier.

If you see the following error when executing the command above,

You can make your first commit on your local repo by running the following command.
git commit -m "first commit"
Don’t forget to replace the commit message with your own message.
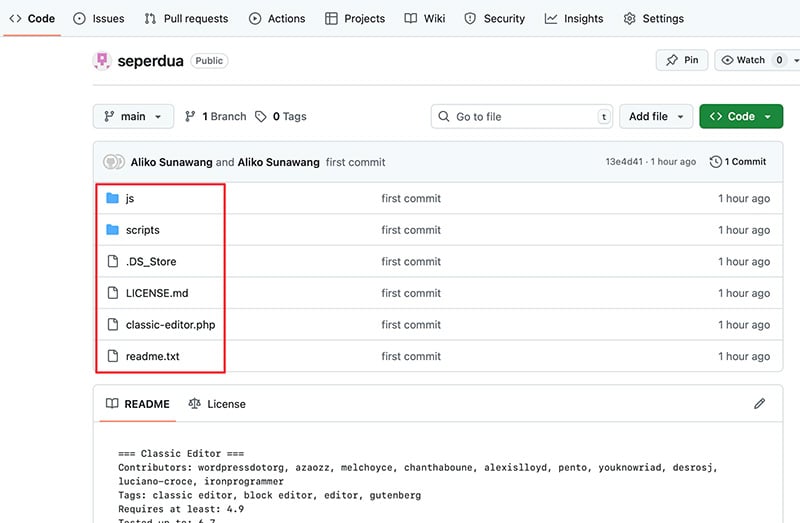
Now, you can go to your remote repo page on GitHub and you should see all the files from your local repo.
Connecting Your WordPress Website with GitHub
Your remote repo is ready. Now you can pull the changes you made on the remote repo (which is on GitHub in this case) to your live WordPress website.
For this step, you need to use a hosting service that supports deployment via Git. Cloudways is one of the hosting services that has this capability.
If your hosting doesn’t support deployment via Git, you can use the WP Pusher plugin.
— Connecting Your WordPress Website with GitHub in Cloudways
As I mentioned above, Cloudways has a feature that allows you to make a deployment via Git. And you can connect your WordPress website with any Git platform that supports SSH. Including GitHub.
To connect a GitHub repo with your WordPress website, first, you need to add the SSH key provided by Cloudways to your GitHub account.
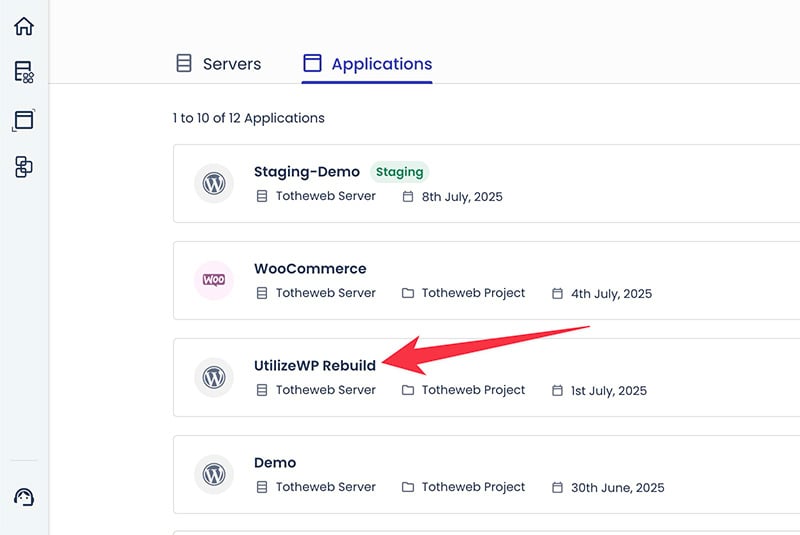
To get started, login to Cloudways and select an application (your WordPress site) that you want to connect with GitHub.
Click the Deployment via GIT menu on the application control panel.
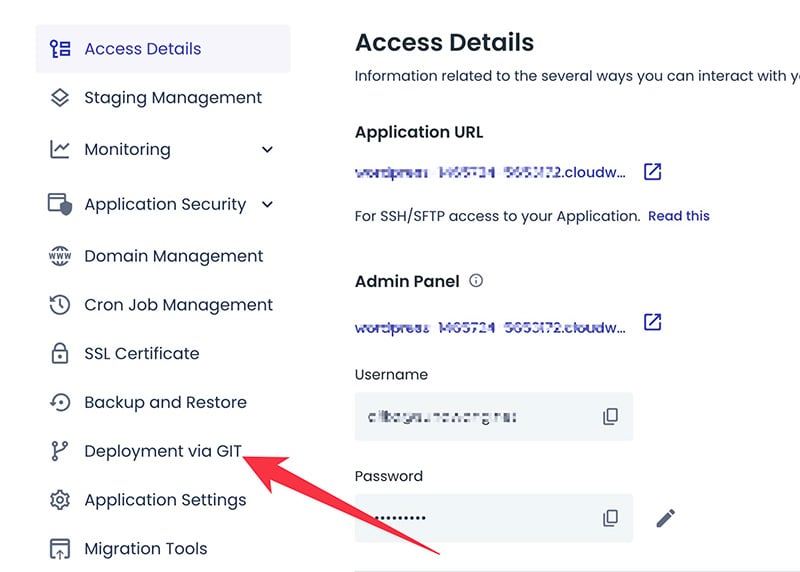
Click the View SSH Keys button and copy the keys on the appearing popup.

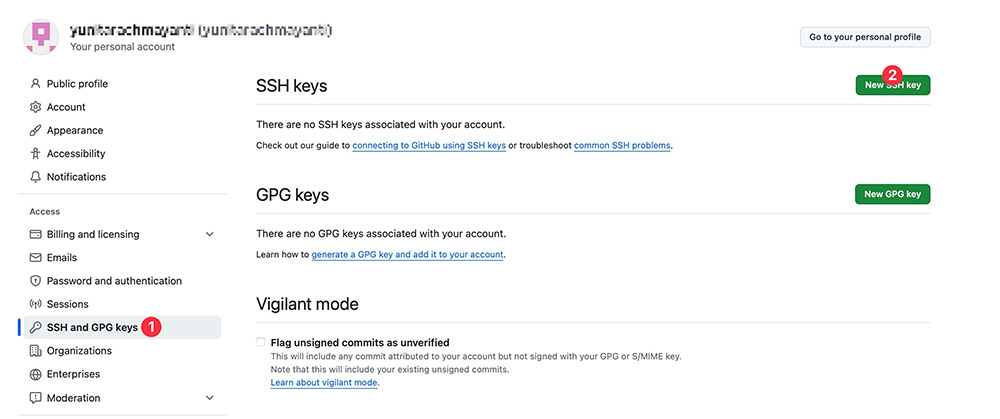
Go to the settings screen of GitHub by clicking your profile image at the top-right corner and select Settings.
This time, click the SSH and GPG keys menu. Click the New SSH key button to add a new SSH key.
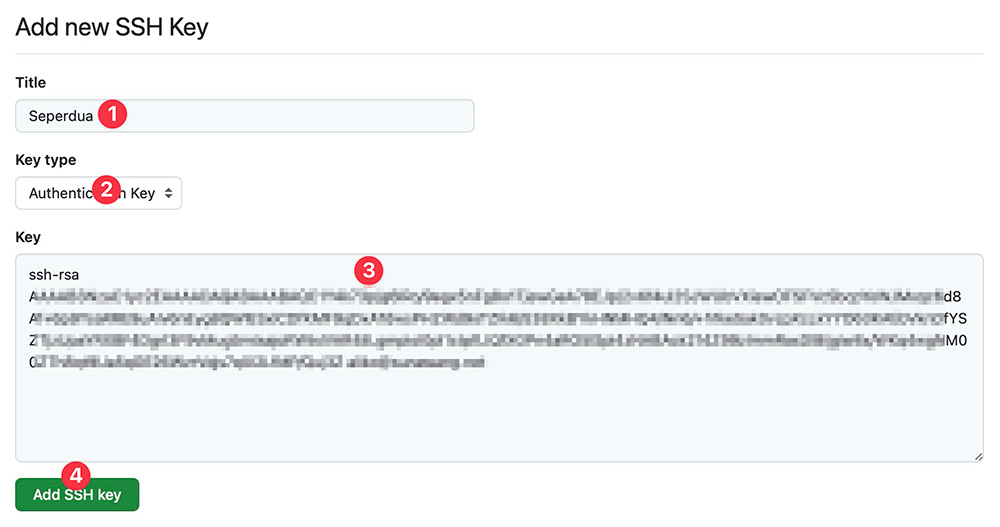
Give your SSH key a title on the Title field. On the Key type option, you can leave it default (Authentication Key).
Paste the SSH key you copied from Cloudways to the Key field and click the Add SSH key button.
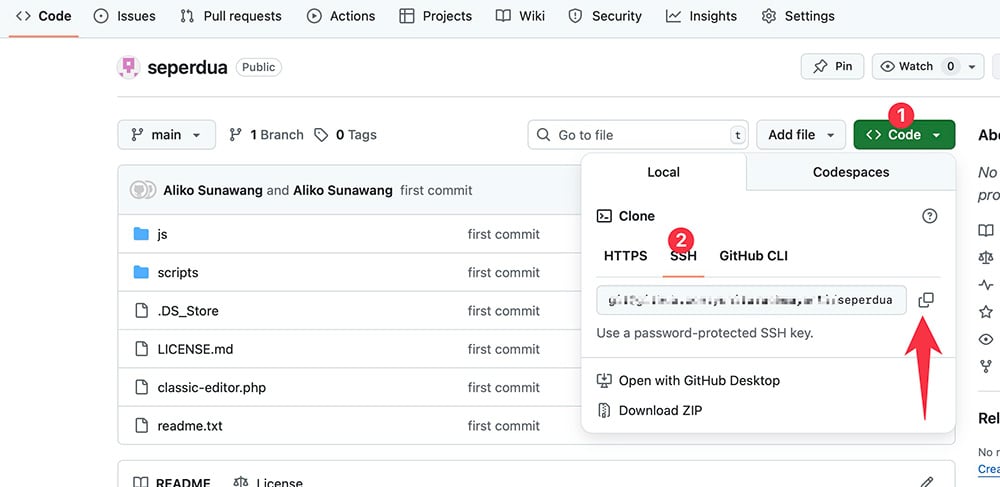
Go to your repo page and copy the repo URL. You can get it by clicking the Code button click and go to the SSH tab on the appearing window.
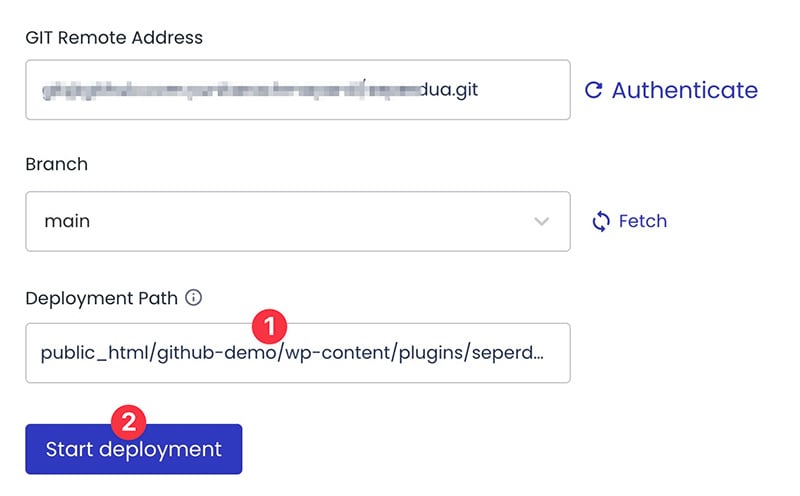
Go back to the Cloudways tab and paste the remote repo URL you have just copied above to the GIT Remote Access field. Click the Authenticate button.

Until here, you have successfully connected your remote repo on GitHub with your WordPress website.
— Start Deploying Your Project
After your WordPress website is already connected to your GitHub repo, you can start to deploy your project.
From the same screen above, you can move on to the Deployment Path section and enter the path of the deployment.
For instance, if your project is a plugin called seperdua, your path should be: root-folder/wp-content/plugins/seperdua. Make sure to replace root-folder with the actual root folder name of your website.
Click the Start deployment button to deploy your project.
Every time you are done making changes on your remote repo and want to pull them to your website, you can go to this screen in Cloudways and click the Start deployment button.
🚨 You can get a 30% discount for three months on Cloudways via the following button. Subscribe ASAP while the discount code valid.
activate discount code
Summary
Git is a popular version control system widely used by today’s developers. Not just in the WordPress scene, but also the programming world in general.
Even if you don’t develop an actual product (e.g. a plugin), implementing Git on your WordPress development workflow is beneficial.
Setting up Git for WordPress development is easy enough. You just need to prepare the local environment to run WordPress locally and set up the local repo.
You can then create a remote repo on GitHub or other Git hosting platforms like GitLab and Bitbucket.
The real challenge of using Git in a WordPress project development is finding a hosting service that supports deployment via Git. Cloudways is one of hosting services that allows you to deploy your WordPress project via Git.
Alternatively, you can use WP Pusher — a plugin designed to help you to integrate your WordPress website with GitHub.